- No more mixing up bread dough just because you want fresh baked bread.
- No digging around to find your pizza or breadstick recipe…this dough is ultra versatile, and ready to go when you are!
- No special ingredients or complicated processes
- Practically no dishes to wash…
- and best of all…no kneading!
Really and truly! The trick is a cold, long fermenting time for the dough, which develops the flavors and gluten, breaks down the carbs…
Wait. You just want to know the really important stuff, right? OK…Easy, delicious and versatile.
AND, for all of you Trim & Healthy folks out there, this is a REAL and true fermented, E recipe…Pearl approved and everything. Really!
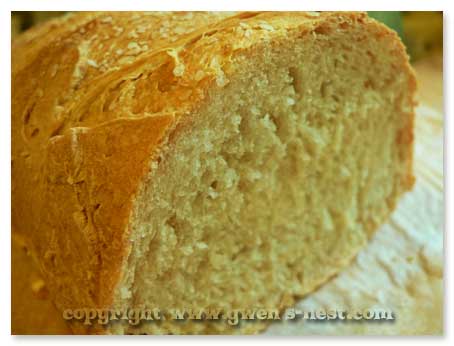
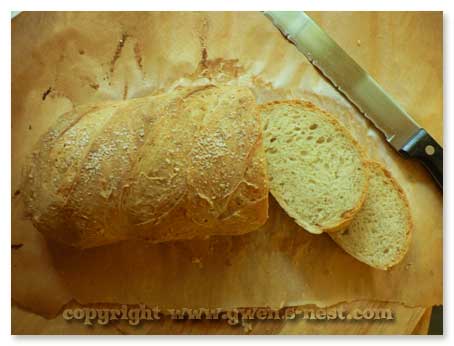
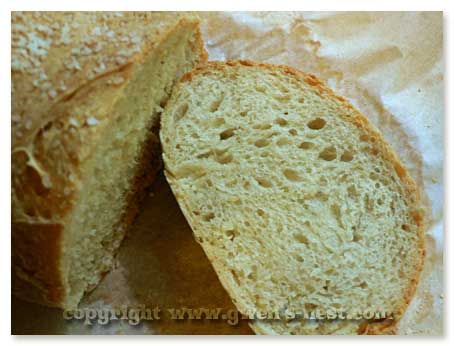
And it’s delicious. It’s the perfect texture for french toast and bruschetta, with a thin crisp/chewy crust; the inside is soft with just a bit of chew. Cold fermentation prevents it from souring, so you’re not going to get a true sourdough flavor with this method.
If you LIKE the sour, you can let it sit out overnight or for up to 24 hours, and then stick it in the fridge.
Did I mention that it’s really, really good? OK.
Just so you know.
It is. REALLY, really good!
I keep a batch in the fridge at all times now. Mostly, it’s used to make pizza, because it’s the most amazing pizza crust we’ve ever had. Take out is forever ruined in a really good way.
Meal planning is so much easier since I’ve found this easy bread
recipe. I have started branching out, and now I use it for pizza crust, dinner rolls, french bread, pepperoni bread, bread sticks…you get the idea. And don’t even get me started on the toppings!

Pass the butter.
What You’ll Knead…or not!
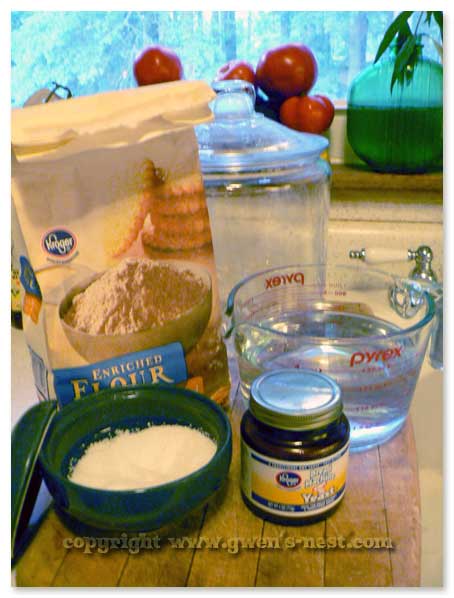
Wonka! Wonka! OK, let’s take a minute to talk about equipment for this easy bread recipe: you’ll need a large container (5 quarts/20 cups/1 gallon) with a lid to mix up and store your dough. Since I am now officially addicted to this bread, I bought a large glass ‘cookie jar’ canister at Wally World for $7 because it’s pretty and it stands upright in my fridge to save room. (Had to flip the lid over to get it to fit.) 🙂 This is the ONE gallon size.
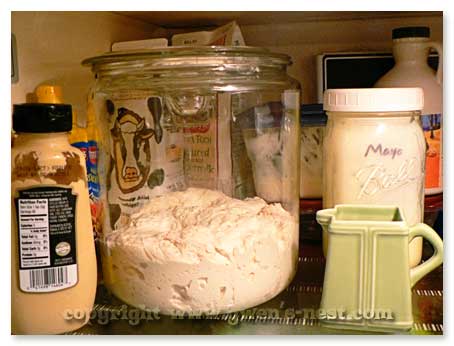
When I first started making this kind of bread, I just used a bowl with plastic wrap or lid, and then switched to a non-holey plastic tub that my salad mix came in. You can also use a big plastic storage container, just make sure not to seal the lid so the gasses can escape.
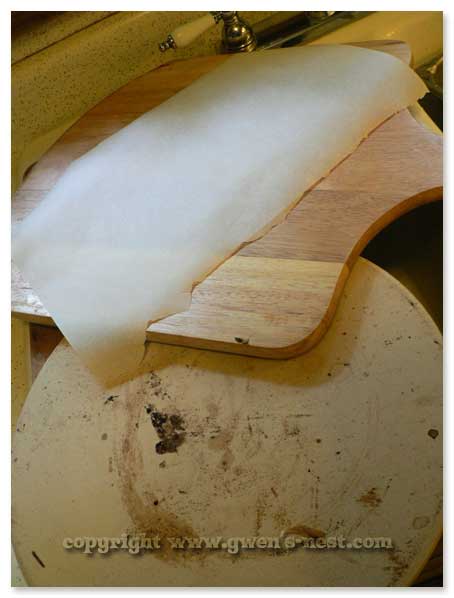
For baking your bread, it’s really nice to have a pizza peel, parchment paper and a baking stone…these are standard equipment here for pizza night. You can’t beat this pair for baking crispy crusts, and for transferring bread dough easily in and out of the oven.
In fact, I leave my pizza stone in the oven almost all the time, and just put cookie sheets right on top of it. It ain’t purdy, but it gives nice even heat. You can find these at Target and kitchen stores for not much money. If you don’t have a peel or stone, then you can use a cookie sheet turned upside down so you’ll have a flat surface to bake on. All this will make more sense further down when we talk about baking.
And finally, you’ll need some TIME. This easy bread recipe is broken down into two parts:
- mixing the dough
- and then baking.
The time you’ll spend in total is just a few minutes to prep the dough and form the bread. But you’ll want to allow enough time for the dough to rise, rest, and develop good flavor. Here is the time frame that I usually use:
- I start by making the dough the night before, or first thing in the morning if I plan on baking a loaf of bread for dinner.
- If you’re working on getting trim & healthy, then plan ahead to get at least 3 days of fermentation in, and for best results go for 5-7 days. Friday is my day to make pizza and make fresh dough. Picking one day a week to have a special E bread meal is a great way to keep up with your dough making.
- Rising takes a couple of hours. (I pop it in the fridge just before climbing in bed.) Then it just sits in there doing its thing until the next pizza night rolls around. Or until I make bean soup and foccacia bread.
- Technically, you can start baking right after the dough has risen, but it’s really soft and sticky, and it’s easier to work with if you let it chill thoroughly…at least 3 hours.
- From fridge to stove for loaves of bread, it takes about an hour and you’re in homemade bakery heaven. For pizza or foccacia, I’m talkin’ about half an hour to dinner!
Let’s get to it!
Mix it UP!
First, pour in your three cups of water. I live in the deep south, so there I use room temp water all year ’round. If you’re from Alaska or the UP <Hi Yoopers!> then you may be inclined to warm your water up just a little to make your yeast happier.
There is no need to rinse your bowl out between batches if you’ve kept it refrigerated…the dough bits that are left in there will help make your next batch rise faster. We’ll call it a ‘starter’
(Note to self…I don’t even have to wash the bowl! Dance of joy!)

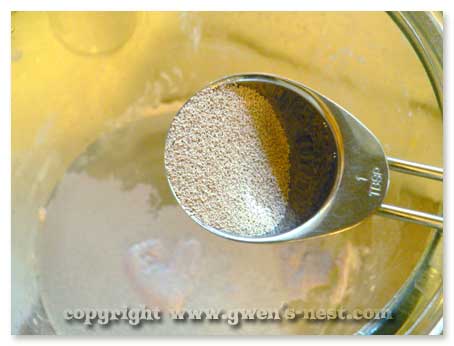
Next, add 2 packets or 1 1/2 T of yeast…
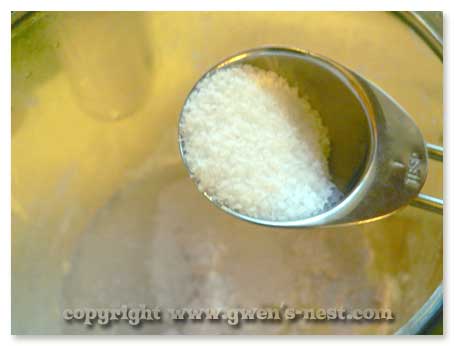
1 1/2 T fluffy salt,…
and 6-6 1/2 cups of flour. Your flour should probably look healthier than mine. 🙂
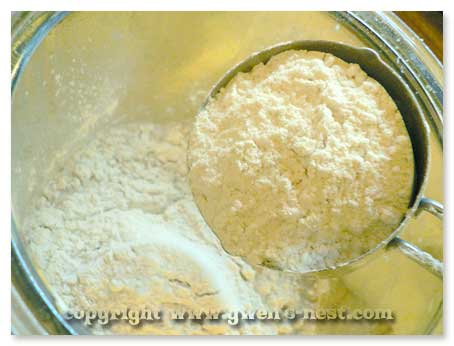
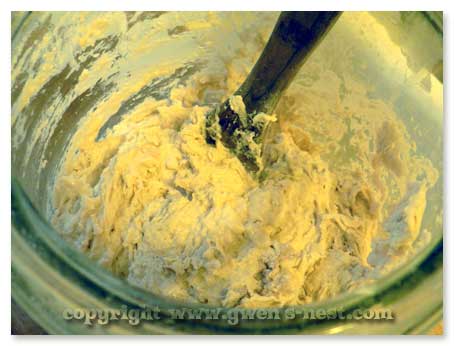
Now mix it all together with a wooden spoon.
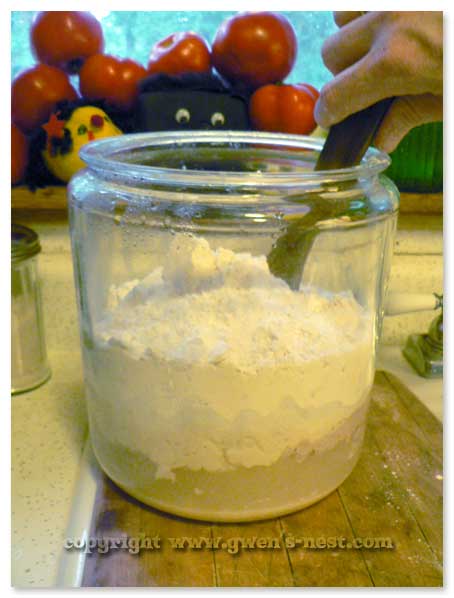
You want a loose, wet dough with no dry spots. Like this:
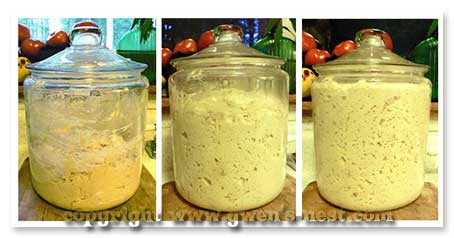 Just mixed, one hour later, and two hours later.
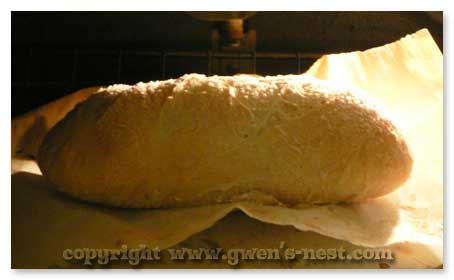
Bake that Easy Bread Dough!
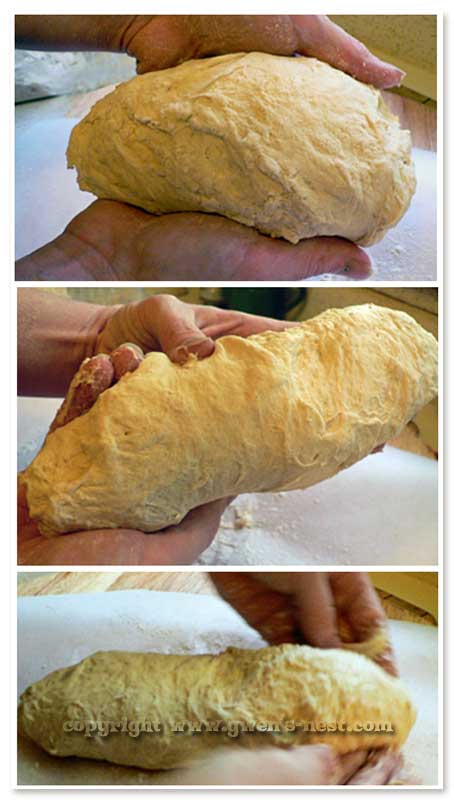
So, let’s bake up a loaf of bread. You’ll want to get your dough out and shape it at least an hour before you’re ready to eat it.
The dough is very soft and wet. I find that wetting my hands is really helpful when shaping it.
Cut or tear off a grapefruit sized hunk of bread dough. The shaping isn’t an art form, so don’t get frustrated by the gooey dough.
Gently stretch it into shape, smoothing out on the top layer into a ‘gluten cloak’. It doesn’t need to look perfect. In fact, there is no way that it will look decent at this stage…just get it into the general shape you want. Here is a quick video about shaping the bread:
You don’t want to manhandle or overwork the dough. It needs to stay sticky and retain all those beautiful air bubbles as much as possible. It will rise up and become beautiful in the oven. Promise.
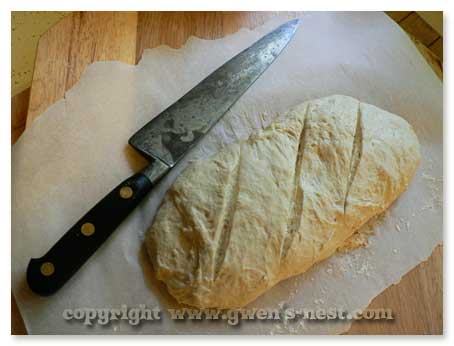
When the oven is heated, and the bread is done resting (it won’t have risen much at this point), you’ll want to cut a few slits in the top to allow the gasses in the baking bread to escape. Otherwise, your bread will get an unsightly blowout. Use a very sharp knife or a clean razor blade, and cut a few slashes, an X or a long slit.
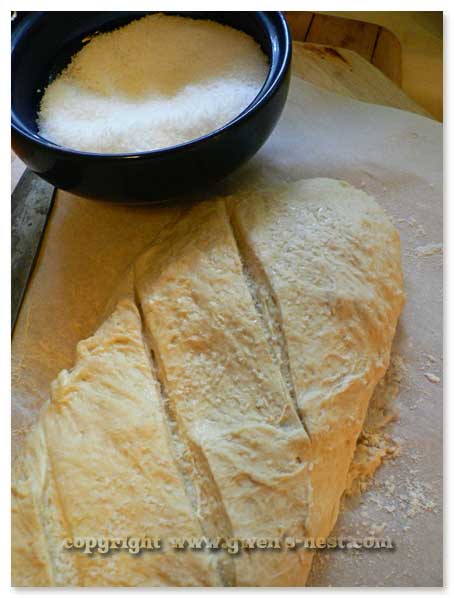
I like to top my bread with more of the kosher salt at this point too.
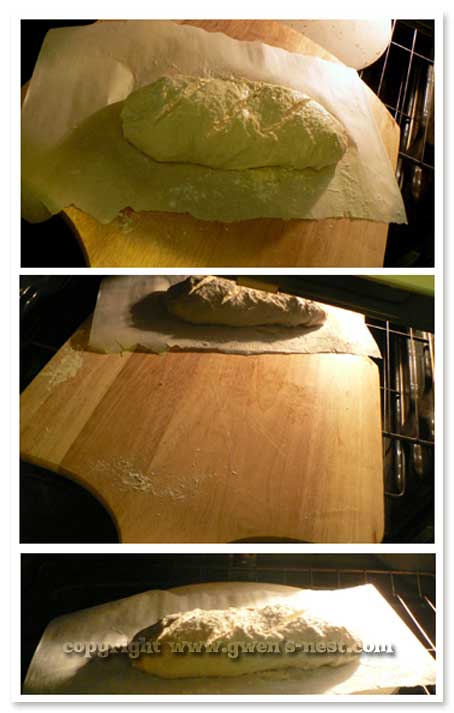
Now slide the parchment paper that’s holding your loaf of bread right onto the sizzling hot baking stone.

- 3 c. warm water
- 1 ½ T. kosher or coarse salt
- 6 c. of whole wheat flour* or 6½ cups of unbleached (off plan for THM)
- 1½ T. instant/fast rise yeast (2 packets)
*You may use white flour, fresh ground whole wheat flour, or anything in between and this recipe will still work. - Trim Healthy Mamas Tweaks: Use all whole wheat, or a mix of 4 cups whole wheat to 2 cups white if you want a little more crispness to your crust. Allow to ferment for a full 72 hours in the fridge prior to using for maximum carb reduction. When the dough has fermented long enough, and the natural carbs in the bread are broken down, your bread won't 'brown' easily.
- In a large, 5 quart container, combine all ingredients.
- Stir with a wooden spoon until the dough is evenly wet with no dry spots.
- Cover your container loosely, and allow to rise on the counter top for 2 hours.
- The dough should almost triple in size and begin to collapse on itself and flatten on top. You can allow it to rise overnight, and it won’t hurt anything.
- Chill dough for at least three hours. You can bake it before chilling, but it’s easier to work with cold, and the flavor improves with age.
- Place a baking stone in your oven, and put a sheet of parchment paper on a pizza peel. An upside down baking sheet can be subbed for either the baking stone or pizza peel.
- Wet your hands. The dough is very sticky and soft. You’ll want to treat it gently so you’ll not deflate those beautiful air pockets.
- Cut or tear away about a fourth of the bread dough…approx. the size of a large grapefruit.
- Gently shape the dough into any shape of your choice on the parchment paper, smoothing out the top into a ‘gluten cloak’. It’s OK if it looks wompy.
- Set a timer for 20 minutes once you get the bread shaped. You're going to let it rise for a total of 40 minutes, but this is my cheat way or reminding myself to pre-heat the oven.
- When the timer goes off, begin preheating the oven to 450º. Set the timer for 20 more minutes. Your bread dough won’t have risen much, if at all, at this point, and this is normal. NORMAL, I say. No worries.
- Top with kosher salt or herbs/seeds if desired. Slash top to allow gasses to escape while baking.
- When the timer goes off, slide the bread in and bake for 25 to thirty minutes until golden brown.
You may use your dough up to 2 weeks past the mix date. It's normal for the dough to have tiny pinhole bubbles in the surface, and for the surface to darken a bit due to oxidation of the very top layer. It will not affect the flavor or quality of your bread.

______________________________________________________________
MORE Easy Bread Dough Recipes!
This easy bread recipe has become the basis for a lot of our family favorite recipes…it makes an incredible pizza crust! Here are all the easy bread recipes that use this dough as the base.

I began baking/making my own breads from sourdough starters in 2009 the starters are still in my refrigerator stored in mason jars, totally neglected for weeks at a time until I am ready to bake bread I usually make a day of it and bake at least 4 loaves (with variations) when I bake. I will be doing some serious thinking about your method, and yes I have the 5 minute Artisan Bread book from when it first came out. Don’t let yourself believe that sourdough is harder. IT is great.
I’ve experimented a little with true sourdough, and am learning to do that as well. 🙂 The original cold ferment method was shared in the NYTimes a couple of years prior to the 5 Minute Artisan Bread book, so there are many variations. I shared the link where I first discovered it.
I can go from fridge to table in about 25 minutes with a flatbread, so it’s a really convenient option for my family. Thanks for the encouragement to dig back into sourdough! 🙂
How do you use this as pizza dough?
Homemade Pizza Recipe [E]
Can I use bread flour instead of the white flour? I’m a thm also and used the wheat and white combo. Love the taste…had a problem with it not rising. Third time instead omitted salt and let it rise in two loaf pans before baking. The dough rose for 2 hours and then I put in oven. It actually baked at that level, no more. Next time I will let it set in oven at least 4 hours before baking
Sure! Bread flour has a higher gluten count. 🙂 I’ve not tried it in bread pans. I stick with flatbreads because the whole wheat makes it heavier.
I’m wondering about your comment regarding leaving out the salt. I tried using “No Salt” the salt substitute…wanted the flavour but DH has to watch his intake of salt. What was happening was a collapse of the top at some point…like a muffin top over the sides of the bread pans. Research revealed that Salt gives the dough “tenacity” to rise up and hold the inflation of air cells in the baked bread. I imagine your loaf would spread more to the sides rather than the top for an artisan loaf.
Thank you for this recipe…well, all your recipes and THM info. I’ve recently started THM and your website has been a tremendous help. I have a question about the browning of the bread, when using straight whole wheat (I’m not a baker 🙂 )
If you did an egg wash, with egg whites, would it brown better?
I don’t think so, but I’ve not tried it. I believe the egg wash is more for sheen than browning but I may be wrong. 🙂
Yes, an egg wash will help with browning. It does also add a nice sheen. 🙂
Hi! I love your site and all the recipes you share! Thank you!! Have you tried whole white wheat flour with this recipe? I am wondering if it will have more of a AP flour feel? Thoughts?
I have tried white whole wheat, and it’s good! The bran is what makes it a heavier final product though…it pops a lot of the lovely bubbles that you want to make it rise. 🙂 But it’s SUPER healthy, so it all evens out, right?
Do you know if using the white whole wheat flour it would have the same glycemic reaction as regular whole wheat?
Yes. They’re the same. 🙂
I’m so confused. I am a post-menopausal, 6 pounds lighter, one-week newbie, thrilled to have found SOMEthing that works and is delicious enough to stick to indefinitely. Am working my way through the books. But I thought one of the basic tenets is zero wheat, no?
Hi Barb,
Nope! THM is not exclusively grain or gluten free, although some people do implement it that way. 🙂 The focus is low glycemic, so grains that are naturally lower glycemic OR grains that have been sprouted or sourdough/fermented work on plan. 🙂
Hi, will sprouted bread flour make a difference in the recipe? Or can I use it the same as regular?
I’d use regular. If you use sprouted, you would not have to let it ferment…it will already be slow carb from the sprouting. So you can use it as soon as it rises.
Hi Gwen,
When using a sprouted flour would it still keep in the fridge for 2 weeks? Also if I a man wanting the sourdough flavor would I be able to leave it out overnight when I first mix up my batch?
Thank you for all your recipes and THM knowledge you really are a cooking inspiration.
Sprouted flour is useable as soon as it rises…no need to let it ferment because it’s already sprouted. But if you do want a more sour flavor, let it sit out, or just stay in the fridge until it hits the point you like. 🙂
Gwen thank you for all your hard work on this site. This is my first attempt at homemade bread. I did the wheat and white combo for THM style but I forgot to leave it out on the counter and just popped it in the fridge right away. Hasn’t risen much over the last twelve hours , should I scrap it and start over?? Thanks !
Just set it out for a few hours and let it rise…it won’t hurt a thing! 🙂
I’ve tried this recipe twice. Once with just whole wheat flour and it was so dense no one would eat it and it really didn’t rise much after all day. This second time I used 4 cups WW flour and 2 cups all purpose and am getting the same outcome. Help?
I’d try it with a different batch of yeast. 🙂
Mine did the same thing, and I bought new yeast for the second batch.
4 cups of whole wheat flour to 2 cups of all purpose or bread flour is still a very high ratio of whole wheat flour to all purpose. A popular ratio in bread baking is 1/3 whole wheat, 2/3 all purpose or bread flour.
Proofing yeast and watching water temperature (shouldn’t be too much over 100 degrees Fahrenheit or it will kill the yeast) are also good ideas. 🙂
Hi Patrease!
Yes, you’re right- using more white flour in the mix does make better bread, but I’m going for a bread that’s healthier that fits into my Trim Healthy Mama diet. So I need to stick to the higher fiber whole wheat ratio. 🙂
But if you want it tastier, the white flour is the way to go for sure!
I love this recipe. Would doubling it work?? Or would you suggest two separate batches?
Thanks!
It mostly depends on how much space you have in your fridge and if you have a large enough container. 🙂 We make a double batch every couple of weeks!
Hi Gwen, if using this as an E meal, how does it work for pizza? Would adding cheese and pepperoni make it an s meal there for mixing e and s?
Hi Darlene,
The recipe as it stands includes a careful cheese measurement and uses part skim mozzarella to keep you in E territory with less than 5 grams of fat per serving. If you use unlimited cheese and other ingredients that add fats, you would be crossing over. 🙂
I have just found your website and joined. I have baked bread for, well… forever!!!!(Can you hear the kid on the movie Sandlot saying that?). But my life has changed, all 7 kids gone. Would love to make bread at convenience rather than have to “get those 6 loaves done before the natives rebel”. I scrolled through about 1/3 of comments but didn’t see any questions concerning rye flour. Would really like to try it. Have you? Did it work. thanks for answering. I am really enjoying your wit and all the work you are putting in to helping the rest of us.
Hi Kathy! Thanks so much for your kind comments. 🙂
I’ve not tried rye flour, but I know Serene has some rye recipes in the original cookbook, and possibly in the new one as well. This recipe in particular is so easy that it would be a good experiment to just test it out. 🙂
I knew if I scrolled long enough I would find the answer to my question! Thanks so much,I am so excited to try this!
Saw your answer in several places to link to the gf bread recipe. It has 4 eggs…can not eat, but will just experiment with your recipe and let you know as I have seen several requests for a gf version.
Jillian, I understand your need for more specialized help. Gluten Free baking is not as simple as subbing things, and adding in other allergies makes it quite a challenge. Have you tried the Allergen Free group for tips and ideas?
Hello! I love this recipe and I’ve been using it for about a month now. But I must be doing something wrong. The first couple of weeks I was using up my regular bleached white flour. It turned out lovely! Then I got inspired, dug out my forgotten grain mill and some wheat berries and started using freshly ground whole wheat. It tastes good but it won’t rise. My loaves look more like flatbread. No matter how long I leave them on the counter before baking, they won’t rise. I used extra yeast the last two batches. Any tips? Thanks so much!
With whole wheat, you’ve got all those little sharp shards of bran (the good fiber!) and it interferes with the lovely bubbles that make the bread rise. Also, your wheat berries may not have as much gluten as the store bought flour you were using…gluten adds that nice elasticicty to your dough. Maybe try a blend of bread flour with your whole grain to try to get a nicer rise. (Bread flour contains a higher gluten content). Or I just use the whole wheat for flatbreads and foccacia. 🙂 Because I LOVE flatbread and it’s pretty foolproof, fast, and very tasty!
Thank you for replying! I guess it’s flatbread for us.
Hi! It looks delicious. Is this considered lower carb bread or just gluten free?
Technically it’s neither. 🙂 The process of fermentation simply changes the way your body uses the carbs so it’s gentler on blood sugars. And I’ve read that this process significantly lowers the gluten, but I would never recommend this for celiacs or those with gluten issues (because it probably does still have some gluten content).
For the whole wheat version, do you think sprouted whole wheat work?
I’ve not tried it, but it’s not necessary to both sprout and ferment. 🙂 You can try it though! In my experiments with sprouted flour, the results are really different (wetter/doughier?) than with regular flour. So not sure how it would turn out with this technique.
First of all, THANK YOU, for this great recipe:) I am using a glass cookie jar type container with a loose fitting lid for keeping my dough in the fridge. I have also tried a rubbermaid container with lid. Either way, after 2 days I get a grey film on the top of my dough. It gets darker the longer I leave the dough in the fridge. Is this normal? What am I doing wrong?
Totally normal…this is just oxidation on the very top layer and it doesn’t affect the taste or quality at all. 🙂
Made this for the first time last week and we love it! I’m wondering if you’ve ever added Sweet Blend to make a sweet dough? If so, how much? I think this might make really good cinnamon rolls. Thanks!
I’ve not tried it! But I really should. 🙂
I’m going to try it sometime soon. I’ll let you know how it turns out. 🙂
I tried it with a recipe for cinnamin roll style sandwiches with a butter etc topping. It worked but was super messy to try to roll. I wonder about kneading in more rye or sprouted wheat to make it more easy to work with for rolled things? I also thought about trying it for soft pretzels.
I have a question about the parchment paper…I used Reynolds brand and it set off the smoke alarm because it scorched. I checked the box and it’s only safe for up to 425 degrees. Do you know of another brand for higher temperatures or can I lower the oven temperature and bake it longer? We loved the bread, but not the chaos of the smoke alarm!
I’ve not had this issue at my house. It may be that your oven temp is higher. I would turn it down to 400, and just bake a bit longer. 🙂
I use ground cornmeal under my pizza when to help it slide off the peel. I wonder if this would help here?
I used to do that as well with regular pizza dough. But a good quality parchment paper makes that unnecessary. 🙂
I have been making this recipe now for over 3 years, thanks to a friend who brought it to me one day. Have shared the recipe with many folks. Have you ever tried to let your kids make pretzel shapes with it? I’m thinking of trying it. Will have to add extra flour when they shape them. They have done pretty good making their own pizza crusts, if I give them plenty of flour when the pat them out. 🙂
P.S. Have made the pretzel dogs for an E. 🙂
I’ve not tried pretzels- let me know how they turn out if you try them!
Can I use self rising flour?
No, you want to stick with all purpose. Self rising has leavening that you won’t need for a yeast risen bread. 🙂
This is an amazing recipe for me! I only have 1 child but this recipe doesn’t take up a lot of time and I can spend more with her or doing other things and still have homemade bread! Plus it is nice you don’t have to stay home all day just to make bread!
I’ve used it for pizza too and I love it, Husband says its a little crispy so lets it sit a bit to let the steam soften it. 🙂 I wasn’t sure how i would like it pre-baking the crust so I experimented some and it works great to just put the dough on the stone cold, add toppings and bake! Still turned out super with a little thinner crust and also not quite as crispy. Thank you for posting!
I made this for the first time today, and it’s DELICIOUS!! I love it, as do my kiddos. Wondering how well it would freeze.
The dough or the finished bread? I’ve frozen a par-baked pizza crust and that worked beautifully.
I’m wondering that, as well. Could I freeze the unbaked dough I don’t use at the moment until I need it?
I would par-bake and then freeze. So for a crust, just shape and bake 10 minutes. For a loaf, bake until set but not browned.
If I am doing thm, what is the most amount of white flour I should use in the easy bread recipe? Love your posts!! And trim healthy Tuesday!! Thanks!
The printable recipe tells the max amount you can use with THM. I’ve stopped using white at all now since I only use it for pizza and flatbread, so I can’t remember off the top of my head. 🙂
Hi there! Thank you for this great recipe! Just wondering if you’ve tried rye flour for this recipe and whether it would work?
I’ve not tried rye flour yet. I’d love to know if it works for you if you try it! 🙂
Thank you for getting back to me so soon! I’m trying it right now ☺ Just made the dough and it’s sitting on my counter for the next few hours! I will let you know how it turns out ☺
I use 4 c whole wheat, 1-1/2c AP white and 1c rye with 3-1/4 to 3-1/2 c water. Also knead before second rise and it is fab! Makes two two# loaves in standard bread pans baked at 375 for 50min. I prefer to let it rise after first mix rather than cold fermentation, but will try that next.
Charlie, so you’re not doing the cold ferment at all? That alters the gluten and the rise may not be as much as if you make it fresh. So glad you enjoy it!
Hi Gwen,
I made the bread today after it being in my fridge for about a week. It tastes awful, it’s really sour. I milled my own wheat from wheat berries, but then used some other Prairie Gold Flour, I buy at wal-mart that’s already milled. I wondered if that flour was bad (I didn’t store it in my fridge and I know I should). It didn’t just taste like sour dough, it tasted fermented.
Also, I wondered if maybe I should have not kept the glass lid on so tightly? I bought the same container as you and left my lid on, should I have vented it?
Thank you for your advice. I’m so bummed because I was looking for low carb bread.
Carrie
Hmmm. It may have been the flour, or it may be that it fermented or soured more when it was sitting out for the rise? A warmer room will make it ferment faster. There is no need to vent the lid.
🙂
We live in Ohio, and it’s been below zero, and our house is only kept at 69 degrees, so maybe it was the flour.I”m going to try again. It didn’t taste that bad, but it was definitely past sourdough status.
Thank you for responding so quickly. I was so bummed, I’ve been looking forward to that bread…but I will try again!
One more question. Next time should I just put it right in the refrigerator instead of leaving it out?
I’d wash the jar and lid really well and let it rise for about 2 hours, and then fridge it. 🙂
Thank you for your wonderful recipe.
I love bread but feel so guilty eating it
because I immediately gain weight
when ever I do
Is it REALLY low carb if you let it sit for
5 days? Sounds too good to be true
Thelma
Hi Thelma! The actual carb count doesn’t lower, but the way the carb is processed by the body is changed in the fermentation process, so it goes from being a naughty carb to a nice carb. For most of us. Try it out and see if you can tell a difference! I definitely can. 🙂
If you generally eat a low carb diet, adding in even good carbs will cause a slight weight gain initially. This is mainly because your muscles use those carbs to fuel their cells. Your muscles take in the glucose and they also retain a bit of water to process the carbs. The scale should move back down if you are eating well- mostly I’m referring to the THM plan for eating. However it’s great for us to have healthy carbs to keep our metabolism revved. If we are always super low on carbs our body adjusts and will store what you give it. Healthy carbs keep our thyroid healthy and our metabolism burning.
Yes…and the liver likes to keep a store of glycogen on hand (sugar water essentially) to provide fuel for the brain between meals. It’s the primary/favorite fuel of the brain, and it’s a normal/healthy part of your body weight.
Hi, I am going to make your easy bread recipe. Will let you know how it comes out. Thanks for posting it.
Hi Gwen! I’m doing THM and love your bread. I’ve got a question regarding sorghum flour. I’ve read that it’s on plan if soured and wondered if your 5 days in fridge principle for bread applied to this flour as well. I’m trying out a pancake recipe so I’ve put the mix in the fridge to sour but not sure how long to leave it to make it as low GI as possible. Are you able to help?
Thank you!
My guess would be 3-5 days. But just a guess. 🙂 That’s the range I’d feel comfortable with.
I found your recipe from the ladies on the THM board and just tried it for the first time. We did the 4c WW and 2c unb AP. So far it looks great. What is an E serving size of this bread though?
2 slices for E and 1 to an S meal to create an S helper. 🙂
Thank you so much. How many slices do you normally get from each loaf? Or how thick should they be?
I gauge it off of a regular slice of bread…there is no need to get your ruler out. 🙂 Just be realistic with yourself and don’t do 2″ thick slices. Hahaha!
Hi,
Thanks for the recipe! My friend loves it and I am about to try it. I’ve been working on making sourdough loaves…i’ve had great luck with my starter but not good results with the loaves…yet. If you find something that works, please share!
thanks,
Emily
I’ve not had great luck with the whole wheat loaves either, but this is my favorite for pizza crust and flatbread!
So excited to see how my first batch tastes! 🙂 Quick question, I didn’t see until too late that your recipe calls for instant yeast. I just used the regular kind. Do I need to let it sit out longer or do anything differently?
Nope! The regular will work just fine. 🙂
I put together the whole wheat sourdough on Monday in the 1 gal. glass container you suggested. I baked our first loaf this afternoon, and all I can say is, “Wow.” My husband and I loved it. Thanks for the recipe and the thorough directions. This is a keeper for our family!
Hi, Gwen. How would this work with rye flour? Would you mix part rye part wheat? THM’r here. I guess buttah is a nono with this too, right?
I’ve not tried it with rye, but rye is so low glycemic that you can really use it without the extra step of fermentation or sprouting. Let me know how it turns out if you try it! 🙂 I’d probably do a mix too like you’re saying.
I am making this bread for the first time and noticed that the top layer of the raw dough has a hard crust on it. I assume this is due to the fact that we leave the lid ajar and the air hardens it. I assume we ditch that top layer prior to shaping our loaf. Just wondering if there is a step I may be missing or if you have any tips for this.
Thanks!! 🙂
I don’t leave the lid ajar…I just make sure it’s not screwed down tight. You want any pressure that might build from the fermentation to get out. I would remove the hard part, and put your lid all the way on next time and it should stay moist and ready to go. 🙂
Thank you!! We love this bread!
Hi Gwen,
Thanks so much for investing so much of yourself into other! We really appreciate it! I am sure this has been asked, so I am sorry. I am a THM, and I am looking to make the bread. I plan on using 4 cups of whole wheat flour and 1 cup of white flour. My main question is, can I use just regular store bought flour? The kind I have right now is called Robin Hood, and its just off the shelf at Walmart ( I am in Canada). I am a little confused, but extremely hopeful that this is okay to use for this recipe. All of the on plan breads on THM are very expensive or non-existent in my area, so this would be wonderful. Thanks so much!
Yep! I’d use it. 🙂
Thanks. Is 7 days ideal if you’re using white flour (2 cups) and doing THM?
I think by day 3 you’re good. 🙂
I, for the life of me, could not get it to look as moist as yours. I added about 1/2 c more water than called for and it still looks dry… I was afraid to “over use” the dough so I stopped. Should I have kept going? It’s been sitting for 2+ hours and hasn’t budged. Should I start over?
Stir in another half cup of water if it’s still not wet enough. If it’s not rising, stick it in the fridge and get some fresh yeast and stir it in and let it warm back up and rise. 🙂
Thanks!!
I’m a true bread lover and baker however I do eat low carb. You mention that the carbs get broken down in the process of making this bread. Can you tell me or do you know the finished carb count of this bread. I sure would love to be able to eat this on a regular basis.
Thank you advance for your reply.
Hi Amanda,
From what I can tell from my research, the carbs count doesn’t change, but the fermentation process allows your body to process them in a much gentler way.
Okay – thank you.
Hello Gwen, I am attempting this recipe, and have a question for you: I just purchased ‘sprouted’ soft white wheat flour from Azure. Do I use it just like any normal flour? I normally grind my own spelt, but am in the middle of a kitchen update and can’t get to my mill! Thank you so much! Blessings!
Hi Patti! You really don’t need to ferment sprouted bread at all…you can use it as is for a lower glycemic bread. 🙂 But if you want to use this recipe, you can totally just mix, rise, and bake! 🙂
I have some sourdough starter in the refrigerator that I make my bread with. I would love to use it in place of the yeast for this recipe so I can have bread in less “steps” than mixing, rising, punching down, rising then baking. How would I use my starter for your recipe or can it even be down? I have only been making bread for about 6 months now and am not sure how to change recipes up yet.
I need to play with this myself…I’m going to try using a cup of starter. Let me play with ratios and get back with you. 🙂
thank you.
I’m interested in this, too.
I am interested too. I am in the process of making the sourdough starter and thought it was part of this recipe, so this information would be helpful. Do you know where we can find any THM approved bread recipes using a sourdough starter? I have found recipes using the starter, but a bit of a THM newbie and concerned I may inadvertently create something off plan or crossover. Thanks in advance!
Hi Shannon! Hmmm. Well, I’m not sure. I know that there are sourdough recipes in the book from Serene. 🙂 I haven’t developed one that I love yet. This recipe is definitely on plan as an E!
Hello Gwen, have you used a sourdough starter instead of yeast, yet? I’m curious if you still need to let it sit in the fridge for three days, since the base is sourdough.
If you’re using THM guidelines, yes, because you will need to give the starter time to act on the added flour. 😉
After 18 months a thm i finally tried your bread! Every bread I’ve ever tried has been a flop & was therfore intimidated to try. I used all white whole wheat. It rose beautifully, i let it sit out for 6 hrs or so to get some extra sour taste. The taste & texture are great, but it didn’t pic up much in the oven. It had fallen about a third while in the fridge & just didn’t rise at all in the oven. Is this just the nature of the all ww flour or is there something i could do differently? While it’s yummy i was hoping to replace my sandwich bread.
It’s the nature of whole wheat- the sharp pieces of bran pop a lot of the air bubbles that cause bread to rise. I use it as a flatbread/foccacia or cheese pizza crust. I’ve seen some ladies who have made beautiful loaf bread in this manner though, and I am going to work on perfecting that technique this year! 🙂
Is it possible to use less salt. I found it was too salty for my taste. I also have Italian sour dough.
I kow that is another story but wantto understand lowerin the carbs.
Thank you,
ana
Absolutely! You can adjust the salt to taste. I use a damp fluffy sea salt, so it’s not as potent as the finely granulated iodized salt from the grocery store. 🙂
I haven’t tried your recipe yet, but I’m going to today. I just want to say that I enjoyed reading your instructions and watching the short video. You made it so plain to understand. Thank you! Jennifer
Hello! I made the bread today and it really didn’t rise at all. Would it still be okay to put it in the fridge for 3-5 days (THM) and use it as pizza crust or flat bread? I am new to bread making and wasn’t sure if it had to rise to be useable. Thanks!!
If you didn’t get a good first rise, then your yeast needs to be replaced. I’d stash the mix in the fridge, grab some new yeast & mix it in, and then let it rise at room temp and follow the recipe from there. 🙂 If your yeast is not working then you’re not getting a ferment and the carbs are not being processed. So you really want that first rise.
Thank you so much. Would you recommend I keep what I have and then just add more yeast and flour or just yeast? I may go buy I different batch today.
Yes! Keep what you’ve made. You just want some living yeast to mix in with it and you’re in business!
Wow! I’m still trying to figure out THM and I am so excited to have found this recipe!! You very well may have saved my diet! Can’ wait to try it. I love that it uses regular flour and I don’t need to go buy something odd from the store just to try this recipe.
Can you leave some dough in the container and add to it after you’ve used some? So that you can bake off of it every day? Like a starter? Thanks much!
I’ve never tried that- it’d be more like a sourdough process I guess? You can bake out of it every day for sure, but not sure about keeping it going from the same mix. If you’re going for max carb breakdown, then you do want a few days to get the yeast working for you.
I can’t find the right parchment paper. All the ones I see say it isn’t safe to use hotter than 425°. What brand do you use?
Mine says the same thing, but I use it anyway. 🙂 If it’s directly over flame it can sear. You can cook it on 400 for just a bit longer if you’re concerned.
Since the resting is excessive, AS in the fridge up to 7 days, does this make this bread less “gluteny” I am not a cieliac, but find gluten makes brain fog. I’d like to try this…what is the science behind the low carb, less gluten formula?
Hi Vanessa!
There is some compelling research out there on long fermentation. 🙂 Here is one of the studies. http://www.ncbi.nlm.nih.gov/pubmed/20951830 I wouldn’t recommend trying this at home if you have celiacs or an autoimmune disease that is triggered by gluten, but if you have a mild sensitivity then this would be a method I’d try!
Good Morning Gwen! Thank you for this recipe! I am wondering if you think it will be ok to use 3 cups whole wheat flour, 1 cup white flour and 2 cups mixed (almond flour, flax meal, oat flour?)
Hmmm…maybe oat flour? I’m honestly not sure what using almond flour would do since it’s a nut and not a grain. Flax may interfere with the rise as well.
Wow!! Love this recipe!!! The first batch I covered in cling film. Didn’t work too well as had lost of hard bits on the dough. Picked off and was fine! Now doing half the recipe on a monday and another half on a friday in a covered container! Much better!
Have also made it with rye flour from waitrose! Love it!! Kids even love it!! So am making both and making sure I have both in fridge!! We had a fab meal tonight of seafood bits and pieces with rye bread and it was delicious!!
Hi Gwen,
Love your site. New to THM and trying out your easy bread recipe. 🙂 today is the day. Ok just wanted to know if it’s normal that, while in the fridge, that it shrinks some? mine has shrunk by almost a 1/4. Just wondered if you could help a sister out…
Cheers,
Tina
Hi Gwen,
This is really good bread!!! The first time I made it I used a 2 gal cookie jar and thought that maybe I had put one too many cups of WW flour in – the bread was very moist and tasty. I bought a 1 gal cookie jar (uses much less space in the fridge) used the 4 cups of WW and the 2 cups of white flour. There was liquid in the bottom of the jar after the 7 days and the dough was goopy – more like muffin mix. What have I done wrong??
You can adjust the water to flour ratio up or down to get the consistency you like. Different flours and even elevation and humidity levels can affect how wet or firm the dough gets. The good news is that this bread if very forgiving, and you just add a bit more flour or water to adjust the texture to where you like it. 😉
Yes! Not unusual for it to deflate a bit. 🙂
Can not wait to try this. One can never have enough Bread!
Like others I have had trouble with wheat flour rising enough with this recipe. For all of you bread bakers out there, do you think adding some vital wheat gluten would help achieve the desired rise? I know it has worked for my Mom and I in other wheat recipes but they weren’t fermented.
Your bread sounds wonderful, I think I can even smell and taste it! Your descriptions make it so tangible. I was wondering if it’s possible to use gluten free flour for this recipe. I am concerned about GMO wheat flours and since they aren’t marked at the store I have been trying the gluten free flours. Please let me know if you or anyone you know has tried it and if it turns out well. Thanks.
Vicki
Hi Vicki,
I’ve not seen where there are GMO wheat strains, but I have started to by organic. I think King Arthur flour is a good brand. I know there is a GF version of this bread on the Artisan Bread in 5 website, if you’ll do a search there. 🙂 Not sure if it’s also THM friendly though. 🙂
Question…..I love this recipe but I am not doing full THM yet. Do you know an est calorie count?
If you buy organic it is non-GMO.
Gwen: Can I have permission to use your collage of Easy bread pictures above, with the copyright still in place on it, as the background photo for a Facebook lunch event I am hosting for our local, unofficial THM group in Greenville TX? I am serving your pretzel dogs and we are going to make the dough as a group. I am printing your recipe and giving you credit at the event. Thanks in advance!
Oh, I’d be honored, Stacy! Thank you so much!
Hi
I have been looking for a bread recipe for ages now since I started my low carb diet which really works for me but the thing I miss most was bread,I have tried all sorts of mixes from oatmeal flour to coconut flour but han’nt had any sucess so I will give this a try, many thanks
June
Hope you enjoy it June! This is a healthy carb, but is gentler on the blood sugars and is very filling. And it tastes like real bread (because it is!) 🙂 Hope you love it!
Last Friday I made up a batch and it rose beautifully. I stuck it in the fridge and left it for six days. I’m hoping to make an E pizza crust (doing THM). I saved the video for today, thinking it would show me the next step in the process of making pizza, but it’s just for baking bread. I don’t trust myself with a loaf of bread. Hee hee.
Do I let the dough rest for pizza? Do I pull it back to make the gluten-y cover? Do I use a rolling pin to smooth it out, or just pull it? Sorry, if you couldn’t tell I need precise directions. I’m not much of a cook/baker! Thanks!
Oops, also meant to ask… Same temp for baking? Bake crust prior to adding ingredients?
I have a post showing you how to make the pizza! 😉 Here it is: https://gwens-nest.com/homemade-pizza-recipe/
Could I use rye flour with this for Thm? I bought some and haven’t used it because I’m intimidated by other sourdoughs
I’ve not tried Rye flour for this. Some flours are softer or gummier in the final product. If you try rye, let me know how it turns out! I might try 2 cups of rye mixed with whole wheat first, and then work my way up if I like the results. If it’s too soft in a loaf, you can try it as a flatbread: my preference for whole wheat breads because you get that lovely crunch factor. 🙂
Gwen- I love this bread and my question is if it is an acceptable E then why do u only eat it once a week??
Thanx
We have pizza night every Friday…so I eat it at least once a week. 🙂 You can have it every day if you want!
Can you explain why this wouldn’t be a crossover using it as a pizza crust with the cheeses?
Sure! A crossover has more than 5 grams of fat per serving, and I use less than that with the type and amount of cheese. 🙂 If you want to cross over just use liberal amounts of cheese and other toppings.
thanks! I do not want to crossover, but know I did, then. What page on the ebook would it talk about the type of cheeses good for a E pizza? Alot of the pictures LOOK like more than 5grams of fat! thank you.
The printable recipe gives the details for how I stayed under 5 grams. 🙂 Just use lower fat cheeses and measure out your cheese.
Oh how I wish I hadn’t purchased that bread machine! I love this bread. Thank you so very much.
“The dough doesn’t like it if you get all worried.” Loved that. 🙂
Ha!
I have a bread machine too, and want to play with recipes that will work in it. 🙂
I bought regular yeast not quick rise… can I still use that and how will it change the recipe?? I’m a beginner bread maker!!
It will work. 🙂
Just made a loaf of easy bread THM way letting it ferment in the frig for 5 days. Oh my, So delicious!!!! This is definitely a keeper. Made the strawberry shortcake recipe too. Not as good as my wheat flour recipe, but good enuf to keep using it to stay on THM. Thanks for all you do. I’ve gotten more recipes that I like from you than the THM book.
another question, I see that the whole wheat versio is thm but why isn’t the white flour thm friendly if you let it sit for 3 days as sour dough, do you know ? thank you darla
The whole wheat flour contains bran, which adds the fiber and nutrition to the recipe. White doesn’t contain any fiber to slow the blood sugar reaction or any nutritional value.
thank you love this bread but only eat wheat kind have to keep diabetes in control, so this means I cant have the white kind right ?
Probably you’d want to use whole wheat in making it. I prefer to make focaccia (a flatbread) or the pizza crust…they’re both SUPER delicious! (The whole wheat version doesn’t rise as nicely, but still makes tasty bread)
thank you so much 🙂
If I use white wheat flour, would that be THM friendly, or no? Or will it matter since it’s being turned into sourdough bread? Also, what kind of yeast is that…there seem to be so many types? Thanks.
Yes! Any kind of whole wheat flour and any type of yeast works. 🙂
Hi Gwen…. just starting again on THM and OVERWHELMED! So my question on this bread is…. if you use the whole wheat version it is healthier but won’t rise like the white version and you use it for foccacia or flat breads. if you use the white version it is for breads and/or pizza doughs??? It is obviously more carby than the Joseph’s breads but tastier. Am I getting this right? My hubby is the bread and pizza maker and NOT wanting to give up his fantastic pizza or homemade rye bread….so trying to introduce something that he will really like. He is starving on the fule cycle week and we are just going to do the normal THM for the next week. ( I was fine on all days so far but the fuel pull days….)And have lost almost 3 lbs so far this week ! Hooray… but it is all consuming on coming up with the right combos and meals… I am getting nothing else done! Any info would be appreciated! Thanks!
Hi Rose,
This bread is on plan as an E fuel if you use the whole wheat instructions above. Josheph’s pitas are a FP.
I really don’t recommend starting out with a Fuel Cycle…it’s much more complex, and he shouldn’t be hungry doing THM. Men can and often need to eat more to sustain a healthy metabolism.
He should really enjoy the pizza crust version of this. Using all white flour is not on plan for THM, but you can use smaller portion of white flour as instructed above. I’ve not perfected a good loaf with the whole wheat blend, but other ladies have had success. If he enjoys baking, maybe he can play with techniques and covered baking methods to get a better rise? 🙂
How do you get it out of the container without flattening it? I feel like I have to manhandle it just to get it out, and then shaping it finishes it off. I’m using half all-purpose and half white whole wheat. Any tips on making this good for loaves?
If it matters, I live around 5000 feet up. :\
Maybe try using bread flour for your half white? It’s OK if you handle it some. I do reach in and separate (start to scoop) the amount I want, and then dump/drop it out of the container just so I’m not over-handling it. I have friends who have great results using a method in a covered pot. 🙂 I’m certain there are videos on YouTube of artisan bread being made that way.
how long can this be left un refidgerated?
It sours if it’s left out of the fridge, but you can use it so long as you like the smell of it. It can just get too sour to enjoy. 🙂 And how long that takes depends on how warm your kitchen is.
Quick question…
Just made this recipe. And for some reason I am second guessing myself that “T” stands for tablespoon! Please say yes it does :/
It does stand for Tablespoon. 🙂
Thanks!
Today is the day we cook the bread! When I opened the jar it seemed a little hardened and semi dry on the top. I just picked that part off and got the wetter dough beneath. Do you think I should’ve added more water during the initial mix?
Hmm…if the underneath part was a good hydration, it probably just means your lid was not on all the way?
Just a little confused. You said not to cover your bread, but that cookie jar lid looks like it is completely sealed. I planned to get the same container at wally world as I have seen them in the past and I love the visual effect. I assume this lid is on there loosely, so gas can escape? Doesn’t it dry out the bread to not have a lid? If I didn’t have that lid, what would I use instead? THANKS!!
You don’t want an airtight seal on your container, since it’s fermenting and the gas can build up pressure. The jar I use just has a lid that sits on…it doesn’t seal, so it works perfectly for this. Any gas that may build up can escape, but the moisture stays in because it’s covered.
Hi Gwen, Finding this recipe was my first visit to your site. I truly enjoyed just reading all the lead-up to the recipe! I even read parts out loud to my son, and he said, “She sounds like someone you would be friends with if you met her.” 🙂 We have our first batch of bread dough sitting on the counter now, and hoping it tastes half as good as it looks in your photos!
Oh, fun, Donna! I love it that my readers feel like my friends. <3 🙂
If you make 3 12 inch loaves and 2 pizza crusts from this batch…Does anyone know how many slices each loaf has? Anyone have any clue on calorie count?
Also was wondering approx. how many slices should each loaf have?
Hi Jen,
I just sort of go by an average bread slice thickness and call it good. Since the loaf is hand shaped it’s really hard to say since some loaves are skinny and long and others squat and fat. 🙂
You’d have to put the ingredients into a calorie counter. I don’t count points or calories or anything like that, so no clue. 🙂 If you used essentially equal parts for each loaf and crust, then you could figure for 1/5th of the total flour for the calorie count, and then divide out by the number of slices you think you’ll want?
I love your recipes…I am 5 weeks on plan with Trim Healthy Mama…I am also gluten free due to the migraines I have when I eat wheat…I am struggling to find low carb on plan bread recipes…I love to cook and made homemade sourdough bread for my family and neighbors for many years…three years ago I discovered the migraines I have had since I was a child are triggered by wheat/gluten…now I’m struggling to replace the bread in my diet…my poor husband (we’re coming up on our 38th wedding anniversary) loves wheat bread but generously gave it up for me. Now I would like to find a bread that both of us could eat. You seem to have a knack for creating incredible recipes…have you found any low carb gluten free recipes? Please consider doing a little experimenting on gluten free breads…Thanks for sharing all your incredible recipes!
Hi Terri,
Wow! SO glad that you discovered the link and can avoid gluten triggers now!
I *do* love to experiment and play in the kitchen, but I’m honestly not great with breads and have no experience with GF outside of the lower carb “flours” on THM. Sadly, I’ve not made friends yet with many of the flours, and struggle with getting past the mushy or gritty textures. I know there are some *amazing* GF bloggers out there who can replicate gluten filled treats, but they’re often using lots of starches that won’t work on a lower carb approach like THM.
Have you tried the THM Allergen Free Facebook group? There are some amazing cooks there who are far more qualified than I am to help you in your quest for a tasty GF bread. 🙂 <3
I thought I had posted my question, but I can’t find it below. My family did not like the bread with the 4 ww & 2 white ratio. Can we use more white flour and it still be acceptable for THM?
Hi Darlene, I’m certain I answered this one…maybe it’s on the Q&A post?
The answer is: the bread is definitely easier to work with and tastier with more (or all) white flour. The reason for this is that the germ & bran when they’re ground with the whole wheat are like little sharp shards, and they pop the air bubbles and impede the rise. So all white bread is almost always fluffier.
BUT, the bran & germ play a very important role in adding in nutrients as well as non-digestible fiber. So without them, you’re looking at a higher blood sugar spiking food with little nutrient value.
So if you want your bread to stay THM friendly, try using it as a flatbread or crust. I’m working on some updates for the wheat version. 🙂 HTH!
Thanks so much. Gwen!
The bread is yummy, thanks for the recipe! I’m struggling with my gluten cloak… My dough is very bubbly and I can’t get it to smooth out. I’m using sprouted wheat flour with some white flour. Is my dough maybe too dry? Today I got a stickier bit of the dough from the bottom of my jar and that loaf I made seems to be rising better. Any ideas?
Sprouted flour already is broken down. Maybe try just using the full amount of white flour, water, yeast & salt, letting it go for the 3 days, and then blending in your sprouted flour and letting it ferment just until it gets a good rise…that may give you more to work with as far as a gluten cloak?
I’d love to hear your results too if you try it!
Just made the dough. Do I put the lid on while it sits on my counter for 2 hours? Does the lid stay on when it sits in the fridge? I’m a little confused about that.
Hi Libby, the lid stays on all the time after mixing: both during rising and in the fridge. You want to maintain the moisture level of the dough as well as keep out other microbes. 🙂
I am trying to make a THM bread and have been experimenting with soaked grains. I know it breaks down the phytates and therefore easier to digest. I have learned there are three ways to break down the phytates: sourdough, sprout, soak. My question is this: would soaking the bread dough for 12-24 hours with 2 TBS kefir make the bread a THM bread? I like kneading my bread so I still did that. The bread is beautiful and delicious….bu CAN I eat it??
Luci, this is a good question, and the THM group moderators or authors would need to answer this for you. As far as I know there is not a definitive guideline for this type of question.
Have you ever tried making half the recipe? Do I need to do anything special?
Yes, a half batch will work just fine! 🙂 Just use a smaller container.
I baked my first loaf of your bread today and enjoyed it so much. I have a question about yeast. Do you use wild yeast or regular? I have read so many recipes about sour dough breads I am confused and don’t really know if there is a difference in yeast. I am THM trying to follow plan properly. Thank you for sharing your recipes:)
I use regular yeast for this recipe, and it does the fermentation action to make the bread plan approved on THM. 🙂 Pearl says.
I mised the bread Saturday and it is Monday now and it doesn’t seem to be changing. I used whole wheat flour. It doesn’t seem dry but not very wet either. Do you think it is okay? I left it out over night the first night and then put it in the refrigerator Sunday morning and it has been in the refrigerator since then. I am a THM’er so I don’t want to eat it unless it is fermenting properly and expelling the carbs. What do you think?
It should have no dry spots at all. Did it rise initially? If not, then you need to get fresh yeast, let it sit out and get back to room temp, and stir in fresh yeast and start over. Letting it rise and then putting it in the fridge. The yeast is what breaks down the carbs.
hello can I white whole wheat flour instead of whole wheat, I find it is lighter?
Yes! So long as it’s whole wheat, it doesn’t matter the color of the wheat berry. 🙂
So I followed your sourdough starter recipe. I ordered the breadtopia kit from Amazon and am in day 5 of it fermenting on my counter: so now what? Do I follow the sourdough bread recipe in the thm book? Or do I use this easy bread recipe with my sourdough starter.( I have about 2 cups growing now. No yeast in it, since I send the dried packet from breadtopia) And if I do, what are the measurements? I’m a little lost now. Help? 🙂
Hi Elle,
You’d use your starter in any recipe calling for sourdough starter. Well, any THM compliant sourdough recipe- you may want to ask on the boards for suggestions. 🙂
I’ve tried it in the easy bread recipe and it breaks it down too quickly and gave it an odd texture, so I need to do additional testing. I do have a recipe for good sourdough pancakes that I make with the starter here.
How can I incorporate this easy bread recipe with the sourdough bread starter you suggested buying from breadtopia. I have 5 days of it fermented on my counter and now I don’t know what to do with it.
Hi Elle,
You really don’t have to let it ferment further in the fridge. You’re ready to make stuff with it now! I’ve done pancakes but not loaf bread with mine.
I found you through THM resources, got the quick start guide found that on THM Facebook group. I’m wanting to try this bread recipe. I’ve made before with my Bosch mixer so, this recipe will be new for me. Can I replace a portion of the water with whey? I’ve got lots of (liquid) whey I need to use. If I use whey how much can I replace of the water?
You can use whey, but it does add some additional carbs to the recipe. 🙂 My guess would be around 1/2 to 1 cup of whey for water? I haven’t tried it. Let me know how it works out!
I used 1 cup of whey and all spelt flour, it did rise. It probably doubled in 2 hrs, I left it sit overnight…by morning it had fallen. I put it in the fridge, Sun a.m. when I checked today it had not risen again. I continue to store in the fridge. Will it rise in a fridge? Or is it too cold? Do I leave it in there a few more days and then take out, til it rises & then place back in the fridge, so it is easier to work with? Recommendations please?
It does one initial rise, and then falls. You do shape and let warm up to room temp but the final rise is in the oven. It doesn’t behave like “normal” bread doughs. 🙂
I used all spelt, now that I am trying to work with it I see perhaps I should have added more flour,…I tried to shape mine but it doesn’t look like the dough in the video….my dough is runny. It is kind of oozing out and not loaf size. I am using a tablet to post this and don’t see option to share a photo. Can I add more flour at this point? It was mixed up last Sat. Night. What do I do to salvage this?
If your dough is runny, then try adding more flour and letting it sit for a few more days. I’ve had some off batches where it seems to ferment *much* faster and gets too runny. I’ve not tried the recipe with spelt- different flours do behave differently. I have heard fantastic things about the spelt sourdough recipe using spelt in the Easy Sourdough Starter Tutorial recipe here on my blog. The Breadtopia website (where I got my starter) has that recipe for making a traditional spelt sourdough if you can’t get this to work.
You can always use it to make a crust or a flatbread if you can’t get the texture right with this batch.
Can we use active dry yeast with this method?
Yes!
I just wonder about using this for pizza crust. Since this is an E bread/crust do you make your pizza without cheese and meat to keep the fat content under 5 grams? TIA!!
Hi Shannon, I discuss what I use for toppings here– it’s really fun to go crossover, but you can *carefully* make it an E meal. 🙂
I like your site. Will visit again.
I tried this again yesterday and we had homemade bread for dinner. Yum! I am in car so do not have book close by. On THM, we can have one slice with S meal, right?
Can you use spelt flour in this recipe?
I’ve never used spelt. Every flour lends a slightly different texture. But I’ve heard lots of great things about spelt flour, especially in the sourdough bread recipe from Breadtopia.
Could you put this dough into brad pans and bake it that way?
I’ve not had great success in doing it that way because I’m now using 100% whole wheat, which makes a very heavy finished product without great rise. I much prefer it as a crust, but I’m still testing out recipes. 😉
Dear Gwen,
I just wanted to thank you again and again for your wonderful recipes. It finally feels like I can enjoy my favorite foods without feeling guilty. Not only that, they are healthy too.
Your wonderfully sweet personality comes shining through in your writings. I so enjoy reading through your postings to see the latest goings on at Gwen’s Nest!
Thank you for the smiles.
Thank you SO much, Nadine!!! Best comment ever. 🙂
I’m just in my first week of really being committed to doing THM after lurking for a long time! 🙂 I love your site and your recipes, Gwen, and just wanted to say thank you! It’s Tuesday here in Malaysia and I’ve just made my dough. Can’t wait till Friday night pizza! I read through all the comments and wanted to commend you for being so patient and encouraging even though you were asked the same questions over and over. I really appreciate how helpful and responsive you are. What a blessing to us newbies!
♥ Thank you SO much, Tina! Hope you guys have a wonderful pizza night! 🙂
I am just starting the THM plan and was wondering if I could make this bread with all white flour and still be on plan? We miss bread so much and can’t find anything we like. I know the wheat is “healthier ” but putting that aside, would the white bread be within the carb count if allowed to ferment in the fridge for 3-5 days like the wheat. I don’t want to be limited to just flat bread or pizza crust. I WANT YUMMY BREAD :)). Would eating the white limit the weight loss.
Hi Yvette,
THM is not only about numbers, and unfortunately only whole grain products are on plan. I agree that white flour makes a really yummy final product, but it’s lacking all of the fiber to help slow the blood sugar rise, so it’s no longer considered a low carb product if it’s made with all white flour.
As far as limiting weight loss, I’m not sure. I haven’t tried it. The crusts and flatbreads have been enough for me, and I occasionally enjoy the sprouted sesame seed bread as toast. I’d recommend the books Artisan Bread in Five- they have a healthy version of the book with lots of variations using whole grains. Maybe you can find a good solution there. 🙂
I do THM and would like to sprinkle with sesame seeds, would that change it being an E bread to a S bread? The bread looks amazing and I can’t wait to try it !!! Thank you !!! god bless !!! Num. 6:24-26
A sprinkle would only be a tiny amount of fat per serving, so I think it’d be just fine. Because the bread is grain based, it’s always going to be an E fuel, but if you add fats that go over 5 grams per serving you’re into a crossover.
Gwen, what adjustments would I need to make to do this for high altitude? We moved to Colorado a year ago and live at 5460′ elevation
Thanks,
Deb
Ooh…not sure. Try this article from Artisan Bread in Five. 🙂
Gwen, I tried making pizza with this, but I did not see directions on how to do it. Do I flatten the dough out with a rolling pin? Do I let it rise 40 min like the bread? How long in the oven and when do you usually put the toppings on? Before baking? during? Thanks! It turned out OK, but I think is could have been better.
You can follow my directions here in the Homemade Pizza Recipe. 🙂 It’s so easy and always turns out great! It’s my favorite way to use my easy bread dough. 🙂
Have made this twice now. Last week I made it one HUGE bread for our Friday evening blessings. (Was able to semi braid it to make it look like Challah.) This week, I made two pizzas and will make a loaf to use for the blessings again. The family seems to like it, and the pizza held up well to be able to pick it up to eat it. I have a question though, the bread and the pizza crust sticks to the parchment paper, is there a way this can be avoided? Thank you for the recipe!
Hmmm…I’ve never had it stick. I guess you could oil it a bit? I like to bake it until it’s well done, and I bake on a baking stone that just lives in my oven all the time, so maybe that’s the difference?
Hi Gwen!
My husband and I just started THM this week and I am already craving pizza and bread.
I don’t have a pizza cooking stone. Could I use a metal cookie sheet with parchment paper?
Thank you for putting together this blog. I know you said it was an act of love. It is very well put together and so organized. Thank you for sacrificing your precious time.
In Christ,
Rebekah
Thank you, Rebekah!
You can absolutely use a cookie sheet and parchment paper. I found my Pampered Chef stone at the thrift store, and bought the other one at Target because we do the pizza every Friday night. 🙂
I use a baking stone that lives in my oven too. The bread is crusty on the outside and moist on the inside. Family really likes this! Will keep trying because this bread is really good!
Hello,
I am enjoying your site! I am wondering Is this recipe and the pizza recipe for when you are at goal weight? I have a lot to lose and don’t want to sabotage my goals. I haven’t officially started yet, just playing around with recipes and finishing the book I still. I am coming from a low carb diet that has stalled. Is wheat flour on plan? I need a little guidance please.
Thank you,
Natasha
Hi Natasha!
I used this recipe with wheat flour all the way through my weight loss process, and had the pizza pretty much every Friday night. Unless you have issues with grains not digesting properly then it fits beautifully with the THM lifestyle. 🙂 Coming from a very low carb diet, you may have to personalize your approach and see which carbs work best with your body and how much/frequently you can enjoy them.
Wheat flour is only on plan if it’s sprouted or (as in this recipe) fermented.
Thank you 🙂 I am still trying to understand the sprouted and fermented. They are all new terms to me.
If I make this bread with all white flour and let it ferment the full 5-7 days will that make it THM compliant?
No, sadly not. THM requires a majority of whole grains to get the fiber and nutrition aspects. It’s just basically white bread if it’s made with white flour.
I can see how this bread can be a life-changer!!! I’m 3 weeks into THM and can’t wait to make this!! Thanks for all your research and commitment to THM!
I’d be interested to know what the actual can count would be on this. Did i miss seeing this info somewhere?
Check out the Easy Bread FAQ post I did for numbers and explanations. 🙂
So you make the dough and put it in your fridge. Grab a grapefruit sized handful to make a loaf and leave the rest in the fridge? How many loafs would you say you get per batch?!
I attempted to make this bread. I waited 4 days before using the dough. when I went to get it out of the fridge it smelled and had a grey color. I think it was starting to mold. Any ideas of what I did wrong?
Did you cover the dough? It should just smell “yeasty”. The gray color is from oxidation on the very top layer…it’s not mold. 🙂
Hello Gwen,
Let me say I’m a big fan of your site..:) but I’m struggle with lot of thing on THM over the last year and half..but that is another story..lol, I wanted so much to try this bread recipe and it be a hit.. I’m sorry to say it was not..lol but it’s not the first time I have tried to make bread and it Flopped..lol Was it my flour. .I bought Bob Mills 100% Whole wheat Pastry Flour used about 3/4 of it and a cup of an 1/2 of plain flour.. it double and I was excited ..waited 4 days and was like NOW..lets do this.. Grab a handful..did not work it much ..I was like don’t work it, I over touch it..lol .. waiting my 40 min and popped into hot over..and it stood still no more rise..no more movement..nothing.. This is normal..I have a nice flat sub bun…lol HELP.. any suggestions. would be great.. Can I use unbleach white flour if Im waiting 4 days or long for THM.. HELP..lol
Be Blessed..
Neketa
Hi Neketa!
So sorry you’re running into problems. The whole wheat version is not going to work like the unbleached white flour version at all, sadly. Pastry flour is probably part of the problem. You really need a flour with a higher gluten content than what pastry flour has to get a rise. But even using regular whole wheat flour you won’t get as nice of a rise. I’ve seen ladies make smaller rolls, and I love it for pizza crust or flatbread. 🙂
Using unbleached white flour will not be on plan, as you need the fiber from the whole wheat to pull back the carb effects as you digest. 🙂
Hey Gwen,
Let me say THANK YOU..lol Though my bread turn out more flat than Nice and Fat,, I was able to cut the loaf into 4 equal chucks and then slice those into…about 3inch wide an about 1 inch think.. BUT WHAT A SANDWICH.. I use them in my First True E Meal of the Day.. A little butter for my fat and loaded it with turkey and peppers with some onion.. I”M so excited.. I baked two more loafed s today and will look for some on Plan Flour, on my next trip to the store.. What other flours can be used? Have a great day and again.. TY.
Any whole wheat flour can be used. SMART lady with the cutting technique! 🙂
This looks doable & affordable thank you very much for bringing it to THM. My family is totally gluten free. Do you know of any other flours this process would work with aside from wheat? TIA, Joan
Hi Joan! I have linked to a gluten free recipe in the Easy Bread FAQ, but I’m not sure if it’s THM compliant.
I have sprouted whole wheat flour and was wondering if I used that instead of regular whole wheat flour, could I just go ahead and bake the bread immediately or would I still have to wait the 3 day period?
I’ve not made it with sprouted flour, but yes…you’d be able to use it immediately after the rise. 🙂
Hi Gwen! Is it possible to use gluten free flour for this bread recipe?
Hi Haley!
I share a link to a GF recipe on the Easy Bread FAQ post (but I’m not sure if it’s THM compliant)
Can this easy bread recipe be made using a gluten free flour? I had just started getting comfortable with THM eating when I found out I am sensitive to both gluten and casein, so it’s back to the basis of trying to find things to eat. Thanks!
Hi Chrystal!
I link to a GF recipe for this type of bread in the FAQ post here, but not sure if it’s THM friendly.
Hi Gwen !
With over 200 comments this may have been asked, but with the way the fermenting process changes how your body reacts to carbs, is this appropriate for diabetics ? In other words, do you know whether this recipe would spike blood sugar ?
This snippet talks about sourdough in gemeral :
“In the long slow fermentation that produces sourdough bread, important nutrients such as iron, zinc and magnesium, antioxidants, folic acid and other B vitamins become easier for our bodies to absorb. Diabetics should note that sourdough produces a lower surge in blood sugar than any other bread: in a 2008 study published in Acta Diabetologica, subjects with impaired glucose tolerance were fed either sourdough or ordinary bread: the sourdough bread produced a significantly lower glucose and insulin response. In the sourdough process, moreover, gluten is broken down and rendered virtually harmless. In one small Italian study, published in the journal Clinical Gastroenterology and Hepatology, in January 2011, coeliac patients fed sourdough bread for 60 days had no clinical complaints, and their biopsies showed no changes in the intestinal lining.”
This article touches on it :
http://www.sourdough.co.uk/sourdough-and-blood-sugar-response-and-diabetes
Thanks in advance.
Hi Kate! I spent some time adminning the diabetics board for THM on Facebook, and because of that I learned that the things that spike sugars are very individualized. Some could eat oatmeal in the morning, but not in the evening. Some could not eat any type of oats at all without a major sugar spike.
I’d probably try it- a half serving (one slice) and see how your body responds to it. I do think this approach is going to be similar to a sourdough as far as blood sugar goes. 🙂 HTH!
Hi Gwen !
Well, I’ve made this bread several times now, and have a “brain” sitting in my Anchor Hocking jar like yours at all times in the fridge waiting to be baked once a week. Not only is this a great recipe that my grandmother, who had a sourdough she saved from “the old country” and kept alive over 50 years would approve, but it has zero impact on blood sugar, fermented at 6 days. I do like to let it proof at room temp longer before cooling just to develop more flavor and allow more wild yeast to join the party, and reduced the salt a bit, but that’s just a personal preference.
You really do have excellent recipes that are perfect for low carb, and have made dozens of them. I’ve baked bread all my life, kneading next to my mother at age 3, and I’m 57 now. Since starting low carb 30+ years ago, with a few regressions that cost me some health, I really thought my yeast-type bread baking days were pretty much over, but not so thanks to you 🙂
I thank you, and my family thanks you.
I should say, in case any insulin resistant or diabetic readers see my comments, that I do 4 1/2 cups whole wheat, and 2 cups white, OR 4 1/2 cups whole wheat, 1 1/2 cups white and 1/2 cup rye. Both produce great loaves of bread. These ratios do not raise MY blood sugar at all after cold fermenting 6 days, but always remember, YMMV.
Well, I just want to give you a hug! That’s fantastic! I’m so glad you’ve enjoyed my blog and recipes, and thank you SO much for letting me know of your success!
Thank you so much for this. I can’t say my bread is perfect…perhaps handled it too much at the second rise….but it’s delicious, and I have a big batch of dough in the fridge waiting for my next bake.
It wasn’t just the recipe and instructions that impressed me, but your lovely way with words. You gave me the confidence to go for it. You are a born teacher.
Thank you SO much, Fran! <3
I made this with all purpose white flour, had a decent initial raise (it at least doubled in size) Left it sit in fridge for 3 days. When I pulled some out of the bucket, It stuck to my hands and wouldn’t maintain shape. It just kinda spread out on the baking sheet in a flat gooey mass. I let it sit and baked it, It tastes good but it’s flat, can’t really make sandwiches with it. do I need to add more flour or do I need new yeast?
It sounds like your dough may have been just a little too soft, or that the gluten broke down after 3 days. Since you’re using all purpose white flour, carb breakdown isn’t the main focus, so you can just bake it after the initial rise and fall…you don’t have to wait the 3 days. 🙂
I got some whole wheat flour last night, so I’ll try again.
Can I use celtic sea salt in place of the kosher salt in this recipe?
Hi Gwen! Thank you so much for the wonderful and easy recipe. I’ve made it twice, once let it sit out to make it sour and one regular. Oh my, best sandwich I’ve ever had! Thank you, thank you, thank you. I experimented with the regular to make some empanadas, it worked great, but I am wondering, if I were to mix some cinnamon and powder stevia while mixing the dough, instead of sprinkling on top before baking, would that affect the rise and consistency of the bread? I miss my sweet Mexican bread…thank you again, you rocked my husband’s world! Lol
I’m betting you could fold it in gently, but if you really want it mixed in well, I’d add it to the mix when you’re making it. 🙂 Great idea!
Hi Gwen! Made this bread for the first time today (after 3 days fermenting) and it KNOCKED MY SOCKS OFF!!
I had to use Pamela’s flour because it is gluten free, but I was wondering if you had experimented at all with making this recipe GLUTEN FREE? And hopefully THM friendly? I am on THM not sure if the Pamela’s mix would really be on plan, but it was absolutely delicious! Anyway, let me know, love your website btw, thanks as always for your encouragements!
Hi Alie! So glad you enjoyed the recipe. 🙂 And it’s GREAT to know that it works with GF flour blends! That’s a question I’m often asked.
Unfortunately with GF flours, there are a lot of starches in the mix, so technically they are not “on plan” with THM. But I think some ladies flex a bit and step outside the box on occasion who have very limited diets and lots of restrictions. So it’s really a matter of personal choice.
This was a fun experiment, as I have never made bread before. The only problem I currently face is the fact that the dough is definitely rising outside of my jar. I don’t think I bought the proper size. Would it be ok to transfer some of the dough to another jar once the 2 hour rise period is over?
This has been such a fun experience! Thanks for making such a fun and EASY recipe.
Sure, Kelsey! You can put some into a another container, or you can just wait a bit longer, as the dough will “settle” once the yeast has processed the sugars. 🙂
This bread is fabulous! My whole family competes over the last bite! I do the 4 c wheat/2c white flour. Many relatives have been over to visit & had some & wanted the recipe. Thanx so much! I love love love your recipes!
Thank you so much, ShonnaNa!
I love so many of your recipes…thank you for posting them here…I have my bread mixed and in fridge, but one question…after it goes in fridge for the 72 plus hours do you keep it tightly covered or still loosely? Thank you for your reply…cannnot wait to try this!
I just keep the glass lid, which I consider to be a loose covering. But you don’t want it to dry out, so be sure it’s not getting too much air in. The loose covering is so that air from the yeast action can escape. 🙂
I am making spaghetti tomorrow for my family and I am gonna try this recipe looks so good.
If you put an Olive Garden bread stick and a piece of this bread in front of me I would choose this bread….it’s just that good.
Can’t wait to make a pizza crust.
Thank you!
*high five* ME too! 🙂
The pizza crust is SOOOOoooo good! It’s ruined us on take out. Enjoy!
Satisfied our pizza craving tonight and the crust was AMAZING!
Making another batch of this perfect dough….not planning on running out!
Yay!!! So glad you guys liked it! That’s my favorite way to enjoy this recipe. 🙂
Do you use the whole thing to make a loaf? The video showed her cutting off a piece. What do you do with the remainder? Do you keep adding to it like traditional sourdough? Thanks!
Hi Liz! I explain how to do it in the recipe. 🙂 I make it up every couple of weeks…it’s not like a traditional sourdough, and is not fed in the same way.
When I use sprouted whole wheet flour can I add all purpose flour as this recipe does to stay in thm guidlines without fermenting it overnight since the wheat flour is sprouted?
Patricia, if you want to make this without a 3 day soak, then you’d need to use all sprouted flour. I’ve never tried it that way, and don’t know if sprouted flour will work well, but if you do get a chance to try it, I’d love to hear how it goes for you! 🙂
The reason you would not be able to use any of the all purpose is that it won’t have time for the fermentation process to break it down, so it would be totally off plan unless you did the long cold ferment method. Make sense? 🙂
Do you use the whole thing at a time to bake? The video showed her cutting off a portion. What do you do with the remainder? Do you keep feeding it like traditional sour dough?
Thanks,
Liz
Hi Liz! I explain how to do it in the recipe. One batch does make several loaves, so that’s why she is just taking part of the dough. 🙂 I make it up every couple of weeks…it’s not like a traditional sourdough, and is not fed in the same way.
Do you know if this great recipe will work with a GF flour like Namaste brand? I would love to make it for my son who has to be gluten free, soy free, dairy free, and egg free. Just wondering if you know anyone who has tried it and was successful. I’m too exhausted and weary to experiment. Thanks in advance!
In the FAQ post (click here!), I link to a GF version of this recipe. 🙂
Gwen,
I’ve made this wonderful bread several times. Thank you sooo much!!!! I noticed in the post that you said that the bread can technically be made right after it has finished rising. Is that ok for THM or were you referring to it can be made if you’re not following thm? Thanks!
That’s if you’re not going for a long soak/ferment…so that wouldn’t work for us THM’s. 🙂
This looks wonderful and you make it look and sound easy. I will try.
Is it o.k. to use vital gluten to help with the rise?
Sure. 🙂 Different flours contain different amounts of gluten. But the problem with whole wheat flour is the sharp little points of the bran that pop the lovely gluten bubbles.
So… just double checking – but making this with whole wheat flour is THM approved?? Anymore guidance on this is appreciated.
TIA
Yes! Pearl approved. 🙂
I wish I could post a picture. Made the most AMAZING pizza tonight using the “all whole wheat flour” version of this bread.
My crust put Domino’s to shame!
I have two questions. First my dough did rise and triple in size. However I am letting it sit for 5 days since I’m doing THM. I have noticed that it has flattened out quite a bit and is maybe only double the original size. Is this normal?
Question two. Can you use this dough to make dinner rolls? If so how?
Thanks!
It is totally normal for it to rise and then fall back down. Using whole wheat makes a very dense, crusty final product, so I think it makes a nicer focaccia flatbread. There are recipes for sprouted wheat loaf bread that would be more well suited to dinner rolls.
I love that you have included a little video! As a fellow THMer that needs to see how things are done, it is wonderful!! I can’t wait to try this bread! Headed to find a bucket to use right now!!!
please forgive my many questions all over your site as I try these recipes. Do you think this recipe would work with gluten free flours such as oat, cassava. rice etc? thank you.
Will organic sprouted spelt flour work in this recipe? Do you know what differences in the finished product I’ll notice, if any? Thanks so much for your reply & your recipe. I’ve got everything I need except wheat flour.
I am not understanding the recipe I don’t think, to make this THM I am supposed to use wheat and all purpose flour, just wheat, or is all purpose okay after fermentation? I am excited to try this, have been missing bread since starting THM
To make this THM compatible, you’d use either all whole wheat, or a mix of whole wheat with a little all purpose flour in the amounts given in the recipe. 🙂 You don’t add additional flour after the fermentation stage, because you want that cold ferment to process the carbs. With the whole wheat, you get a heavier loaf, so my preference is to make a flatbread- thick or thin, the texture is really lovely and soft or very crunchy. It’s a great recipe to play with! Enjoy!
Hey there ! I am new to THM and really jazzed about it. I have done a lot with sourdough in the past, but not this no-knead cold method. Typically, I make spelt sourdough as my children have gluten sensitivities. Do you know how I could take my spelt sourdough and use your method as outlined above ? I am thinking that instead of yeast and water, I would add some starter ???
Would anyone here know how I could do that ????
Thanks. .. . and thanks for your blog. It has made my THM journey a lot easier 🙂
I am about 80% Purist and the rest I am totally Drive-Thru Sue. Quite a funny combo !!!
🙂
If the dough is an E, how do you top your pizza to keep an E or do you do a crossover?
I explain in the cheese pizza recipe. Essentially, you top it so that your serving doesn’t push you over the 5 grams of fat to keep it in an E mode. 🙂
Could this be baked in a loaf pan? Perhaps a stone loaf pan?
Hi Bekah,
If you’re using all whole wheat, then the loaf is going to be very dense and not rise as much, so I prefer using it for a flatbread/focaccia, or pizza crust…both are AMAZING!
Some people have had success baking loaves with this recipe, but mine is just too dense for my taste.
Help! I mixed up the dough for the first time today. Used 100% whole wheat flour and put it in a gallon size cookie jar to rise. I sealed the lid (might be the issue), placed it in my pantry (a warm spot), and checked on it after an hour. It had risen so high that it popped off the lid and spilled out a ton of dough (which I placed in a new bowl). I resealed the lid (same mistake) and checked on it 20 minutes later. It did it again! So I moved the spillage to the other bowl and this time I placed the lid on loosely for the remainder of the second hour. Is the spillage a direct result of the sealed lid? I’m afraid, if I hadn’t moved the spilled dough to another bowl, I would have had a lot of wasted dough. Any advice? I’m new to THM and desperate for on-plan bread!
I think the air pressure with the sealed lid is causing the problem. 🙂 I’ve used a one gallon glass jar for years with this recipe and never had it spill over with a single batch of the dough.
I’ve been a bread maker for 30+ years but am so happy to find this recipe! I am alone now and have lost 52# on thm. If this works it will be a Godsend t me!
I mixed my first batch last night & let it proof , which was wonderful in my very warm from the fireplnce home. Then I changed my mind about my container and the dough completely deflated in the transfer. It was in the fridge all night but still looks the same, all deflated. Is that ok?
Also, I was wondering if I could bake in a loaf pan for sandwich bread. You never mentioned anything but free-form on the stone. Is there a reason not to bake in a loaf pan?
Thank you! I’m letting it ferment for 4 days & will bake my first loaf on Christmas Eve.
Love and peace to you, Gwen! You are an inspiration to so many women!
Wendy Pedigo
Deflating is fine…pretty normal. 🙂 I use all whole wheat, so I have had the best luck just keeping it as a flatbread.
made it w/ sprouted wheat and forgot to score. Wold that be why it’s gummy? 3 loaves worth. 🙁
Sprouted wheat can just be gummy…it’s sort of a different animal. 🙂 No need to cold ferment if it’s sprouted though!
This is an E. I am very new to this, but can we eat flour? Is it do to the fermentation? My family would love this.
Whole wheat products that have been fermented or sprouted are on plan. So for this recipe, I’m doing a slow cold ferment…totally on plan according to Pearl, the author of THM. 🙂
Hi Gwen, how many loaves do you get from this?
I get about 3 loaves, but I don’t make loaves when using whole wheat. They are too dense. 🙂 I get 2 super huge pizza crusts, or 3-4 medium sized pizzas…our preference for the whole wheat is crusts or flatbread. 🙂
You said to use 1-1/2 T of salt if using kosher salt and 1-1/2 t if using regular table salt. What about if using sea salt? I would think that would fall more under the kosher salt category but considering the big difference in amounts, I wanna be sure! Thanks!
The thing to look at is texture: if your salt is BIG and fluffy, use a larger volume. If it’s finely ground like “normal” table salt, use the smaller amount. 🙂
Maybe it’s the type of yeast, but I wondering what feeds it in this recipe? I have always been told the yeast needs some kind of sugar – cane, syrup, molasses, etc. I use a bulk Red Star yeast. Will this still work?
The carbs in the flour feed the yeast. 🙂 Any type of live yeast should work with this recipe.
Thank you!!! I am looking forward to having bread after being without for 1
1/2 years. 🙂
Do you think that it would work with other non-wheat flours? One of my kids is allergic to wheat.
I have never tried it with other types of flour, but I linked to a GF version here in the Easy Bread FAQ post. 🙂 Not sure if it’s on plan, but it’s GF for those who need it to be.
I have starter I keep and feed. How much of that should I use with this recipe?
Hi Gwen,
My family and I have been on the THM plan since Jan 1, and have been without bread since before then. The spouted grain store bought bread is so expensive. Anyways I was looking for a good sourdough recipe that I had all the ingredients for, and found yours. Anyways, my question is can this bread be baked in a bread machine if I skipped the mixing and rising cycles and go straight to the baking cycle? Its OK if I can’t, the recipe looks extremely easy either way. Thanks for the recipe,for making it easy, and with ingredients I have on hand.
I’ve never tried it! I think I’d still do the rising cycle, because you’ll need to go ahead and cold ferment the dough ahead of time. 🙂 If you give this a try, let me know how it goes!
Letting my dough sit for the 40 minutes before baking… I’m excited to try it! I am using a sailboat, so no pizza stone. Do you think cooking time would be the same?
And by sailboat, I mean silpat! Haha, autocorrect!!
Hi Amanda! You’ll have to gauge cooking time…you may want to go a little longer with the silpat since the stone helps concentrate the heat. 🙂
This recipe looks great!!! Thank you so much for sharing it. I love that you can make it and not bake it for up to two weeks. I have something to put it in now I need to mix it up!!
Love that I found a regular bread to have on THM! Thank you!
My first loaf was really wet so I did add more flour to the dough and let it ferment for a few more days. The second turned out great. Now I am cooking the last 2 and found the bottom of the refrigerator bowl to be really wet again! Should I be stirring or kneading the dough as it sits in the fridge? Help!
The extra liquid does tend to hang out at the bottom of the container. Stirring would disturb the lovely air bubbles, so I wouldn’t advise that unless you’re refeeding with a little more flour and letting it sit again.
Maybe just lower the water content for your next batch? Flour’s ability to absorb water is VERY fickle. It depends on the relative humidity, elevation, freshness and type of the flour,etc. So it’s impossible for me to give a 100% accurate measurement. What happens though is that as you make it a few times, you’ll get a feel for the right dough consistency, and can tailor your flour to water content to work for you. (And that will vary some from batch to batch.)
Thanks! I’ll keep experimenting!
I love your writing style as well as your recipes! Since laughter is healthy, your recipes are doubly good for us as we chuckle our way through your directions! Thank you! We have made our own oatmeal bread for 10 years or more, but it wasn’t THM! I am so thrilled to find a bread that I can eat that is THM!
Thank you so much, Shelly! Hope you enjoy! Our favorite is using it as a pizza crust. 🙂
Hi Gwen!
First of all, I have to thank you for putting time into such an awesome blog!! I love reading it and have found so many good recipes!
I am planning on making this sourdough bread, and have my starter all ready (!) but am a little curious. I have never made white flour sourdough before… is it on plan? I have a white flour starter right now ( is that ok), and was curious if I could use that and add spelt for it to be on plan, or how much of it can be white for it to be still on plan.
Oh yes, and what kind of yeast is on plan? I have and active dry yeast and would like to know if that would work.
Thank you so much!!!!
Here is a starter I have also made… with it soured this way, would it be on plan, or do I still need to use mostly spelt or rye?
http://www.thekitchn.com/how-to-make-your-own-sourdough-starter-cooking-lessons-from-the-kitchn-47337
Hi Heidi! On THM, you can enjoy 100% whole wheat rye bread without it going through a sourdough process, because it’s a lower glycemic grain already. I’ve heard that spelt makes a great sourdough bread from a friend, but I haven’t personally tried it yet. 🙂 The starter you’ve made looks good! I believe you can transition it to a spelt flour by cutting in a portion of spelt flour as you feed your starter.
I stick with the Easy (Cold Ferment) Bread, because it’s just so much simpler. 🙂
Hi Heidi!
So, the THM version of this recipe only uses a small percentage of white flour, and it doesn’t rely on a starter. It’s a cold-fermented dough that uses regular baking yeast to get the process going.
I do have a sourdough pancake recipe, but I’ve not really experimented enough with on plan sourdough recipes using traditional starters. I think that Serene has some true sourdough recipes in the new cookbook, though.
So for this starter that I have already made using white flour, if I just mix up a batch with the added flour being either spelt or rye, and that will be on plan? In future I’ll make regular sourdough with maybe just 2 cups of white. 🙂
Thanks so much for your help! Hearing from someone who knows has been a real blessing!
Eek! I’m SO not the girl who knows on this one. 🙂 I don’t have enough experience with a true sourdough. I can tell you that white flour is not on plan with THM, due to the fact that it doesn’t have the fiber needed to slow the metabolism of the carbs. And if my memory serves, the flour you use in the starter should be the same (type) of flour that you use in your final bread. Using a different type of flour can negatively affect the outcome and rise. I have heard that you can transition a starter from one type of flour to another by gradually adding in more and more of the different type of flour as you feed your starter. That will gradually transition you over to using all of the new type of flour.
I found some VERY helpful tips over on the Breadtopia website, and have heard great things about their spelt sourdough recipe.
Hi Gwen. I have made this recipe a few times. The white flour version is obviously the tastiest. However, to make it healthier, I have been trying to use all whole wheat sprouted flour and leaving it for 3 days in the fridge. However, it is always a “goopy mess”, ie, VERY wet and sticky. I end up having to add so much white flour that it isn’t so healthy anymore. Any tips for all whole wheat? Perhaps I’m not using enough? Thanks in advance!
You just adjust the whole wheat flour up a bit, or use a little less water to get it to the right texture. 🙂 Flours are somewhat fickle even with varying humidity. So you can just keep adding to get it just right prior to the cold ferment.
I think Gwen said of you are using sprouted flour you don’t need to ferment it. I hope I was understanding that correctly.
Or do you have a tortilla recipe that is THM approved?? If you do I must have missed it on your site.
I did make one with sourdough here at the Grain Mill Wagon. 🙂
My dough was not at all sticky, and the finished product was quite dense. What did I do wrong? I was using 4.5 cups whole wheat to 1.5 AP flours
Hi Sarah,
It sounds like you need a little more water. Flour’s absorption can be SO fickle, and can depend on the relative humidity. So you’ll just want to add a little more water next time to get it to a wetter consistency.
Thanks for the easy bread. Tried it a few times and my crust is always soo hard and can something sweet be made from it?
Gwen! I tried to search for this answer and just want to make sure it’s correct. I’ve already let the dough rise on the counter for 2 hours and now placing it in the fridge. Do I seal the lid or still leave it loosely on the container while in the frig? I’m thrilled to try it on Saturday!!
Just let the lid sit on without sealing it, but don’t leave any gaps. You want to let the air escape but not let the dough dry out. 🙂
I cant wait to try this
Will be trying this.
My dough has been in the fridge in my Wal-Mart jar 🙂 for 4 days now. It’s smaller (and stickier-looking) than when I first put it in the fridge. Is that the way it’s supposed to look?
Looking forward to my first “real” bread in over a month now!
Totally normal!
In the recipe you said that this bread should not have a sourdough taste. My dough had a sour smell after being in the fridge for a couple of days. Today (Day 5) I threw the dough out because if smelled very sour. The top layer of dough was very hard as well. When mixing the dough, I let it set out for a couple of hours and then refrigerated it. I can’t figure out what went wrong. Should the dough have a sour tast at all? It definitely reminded me of a true sourdough, but continued to get sour.
Hi Milah,
Did you cover the dough while on the counter and in the fridge? The traditional sourdough taste is from the blend of beneficial bacteria that were originally caught from the air and from the wooden bowls that the flour and water were mixed in. In this recipe, we’re using just the one type of yeast to ferment the dough, and it doesn’t have a sour taste in my experience if you keep the dough covered and reduce exposure to other microorganisms. 🙂
Hey, I’m trying your recipe. I halved the amount and threw it in my bread machine on the dough cycle. we’ll see how it goes. my man has been complaining mildly that the bread is too sweet. So I wanted to go to a more traditional 4 ingredient bread. I bake a lot, so the ratios water/yeast/flour seem normal.
We’ll see. If it’s a flop- he can eat the milk bread I made Wednesday.
I’m interested to hear how it turns out! 🙂
Hi there Gwen,
Do you know of a recipe like yours that can be done in the bread maker?
One with sprouted whole wheat flour.
A friend is hoping for such a recipe.
Thank you. 🙂
Jacqueline
Can you use organic sprouted whole wheat for this recipe?
Sure! 🙂
Gwen, thank you SO much for this recipe! I made homemade bread all the time before THM and hated to give it up. Now I always have a batch of this bread dough ready in the fridge. I tried it as pizza dough last week and it made the most amazing rustic pizza. Thank you!
Can you make this with natural yeast? If so how? Thanks!
Hi! I’ve made this thrice (THM style) and am really liking it! It makes a great pizza dough. Almost have my husband convinced 🙂
I find that it’s easier to put the water in first, and to mix it with my hand mixer in a bowl. I’m exhausted after trying to hand mix it in a tall jar! Just thought I’d put that out there!
Thanks, Gwen for your THM recipes! I’m just getting into it but have already lost 2 stubborn lbs even with all my newby mistakes, lol.
Hi Gwen, thank you for this recipe! Made pizza tonight and it was yummy. My dough came out a little too salty for some reason, but I’m assuming it’s because, I used regular sea salt rather than “fluffy” salt! But it really is a forgiving dough. It’s awesome.
When you say 1 1/2 T. Of kosher salt, does the T stand for tablespoon or teaspoon?
Thanks.
Hi Gwen. 🙂 I use this bread recipe alllll the time and LOVE it. Thanks for sharing it. I recently made a sourdough starter. Could I somehow use that instead of the yeast? And would you by chance know how much I’d need?? If not I’ll keep browsing until I come across something but I thought you might know. Thanks again for all your amazing recipes. Cheers
Tina
No on the starter in the recipe then?
If I do use regular white AP flour, and let it ferment in my fridge for the 3-7 days, will it still be THM E approved? Or does it NEED to be whole wheat flour?
I just made this using whole wheat and I loved it by my kids and hubby weren’t too excited. Trying to make it where we all enjoy, and can eat the same loaf! thank you for your amazing recipes!!
You can do the THM version in the recipe using a little AP flour, but it needs to be majority whole wheat for it to be THM friendly. 🙂
This is a delight. Lots of helpful visuals!
Thanks 🙂
can I bake this in a glass bread pan so that it will be rectangular slices?
I’ve not had success with this, but some have. 🙂 Try it?
I tried making this for the first time in Wednesday. I was going to bake it on Monday and then realized this made so much bread 🙂 there is only 2 of us. Your recipe says I can leave it in there 2 weeks. Do I have to do anything or it’s just fine sitting there for that long with no additional mixing etc. Does it still taste good after that long or is it more sour? I like sourdough so I don’t mind. I also made mine with all whole wheat and it rose to the top of the container like yours (I bought the same container at Walmart) so I’m hoping it comes out good! Thanks for all the recipes.
At 2 weeks, it’s pretty sour. In the future, you can make smaller batches. You can also par-bake pizza crusts (first 10 minutes, until it’s set) and freeze to bake later.
Gwen…
Do you seal the lid on your container of dough in the refrigerator?
No…It should be on the jar so that the bread won’t dry out, but it should not be sealed because fermentation can cause pressure to build up.
Another question…
I made the 100 percent whole wheat version. Based on what I have read, you use that to make a flat bread. Do you still use about one third of the recipe? Clearly you wouldn’t need to shape it the same way so should I just spread it on a stone? I don’t want to mess this up as I am desperate for a plan approved bread that doesn’t break the bank!:)
I use any amount…1/3 to 1/2 of the recipe, depending on how large you want the bread to be. The 1/2 batch makes a HUGE pizza or flatbread. This is how I make focaccia bread
I have a question, rather than a comment.
I made this with whole wheat flour. Everything seemed great. I put it in a plastic container with one of those stretchy plastic covers on it and put it in fridge for about a week and a half tops. I got it out to use and the top of it was a browner color and had a bit of a sour smell. Is this normal or should I dump it and try again. I just took the top layer off and was going to use the other but I really don’t know if I should or not. Help, please.
Totally normal! 🙂 If you prefer a less sour taste, use it closer to 3-4 days in. The top has dried out due to the amount of air in the container. That’s normal, but you can use a smaller container and it won’t dry out as much.
Can you make this bread with the THM baking blend to make it low carb?
Nope…this recipe depends on the gluten in the wheat flour.
Sounds marvelous! And it’s THM friendly!!
Do you think it would work with Spelt flour? Rye?
I haven’t experimented with those particular grains, but it should work!
We’ve been THM for several months and have pretty much done without breads… until now! Made a batch of this and baked up a loaf yesterday… WOW! Amazingly easy AND tasty!! Gotta make sure we don’t over-do it now! Thanks
How does this bread work using Oat flour? Almond flour? Rice flour? I have a gluten intolerance person and a celiac person I bake for. Thank you!
I’ve not made a GF version, but I need to give it a whirl…we’ve been GF for a while now, and I really miss the easy bread. I’ll do some testing!
I’m a Yooper! I look forward to trying this – I’ve lost weight too, and I want easy – no fail! Thank you.
Love your recipes! Do you think I could use Rye with this?
I think so! I haven’t tried it though. 🙂 And Rye has a slower blood sugar effect anyway, so the 3 days fermentation wouldn’t be necessary. 🙂
You won me over when you said HI to Yoopers! I am going to give this recipe a shot. Thank you from the UP.
Ha! Hello from the south! 🙂 Hope you enjoy!
How is it Thm friendly? Is it the process it goes through that doesn’t let it spike your blood sugar?
I explain more in the Easy Bread FAQ, but basically a cold ferment is similar to the sourdough process in how it processes the carbs.
Question. .can I bake this in a bread pan for sandwich bread? If so would the instructions be the same? Cook time and temp. Would love to know if anyone tried it.
Thank you for the recipe, I can’t wait to try it! Much cheaper than buying sprouted flour too!
I prefer it as a flatbread…using whole wheat flour affects the rise, although I’ve seen ladies who have had success using some sprouted flour that they add after fermenting to help them shape it. 🙂 Best of luck!
I was wondering if you could use Light Rye and Spelt flour in this recipe? Thank you!
Sure! 🙂
Hello Gwen,
Your bread sounds and looks delicious! Is the salt necessary, I ask because I have high blood pressure?
Thank you for your time and consideration.
Sincerely
Marie
Hi Marie,
The salt is for flavor. 🙂 So you can adjust to what you need/like.
my dough always comes out really wet. so wet it won’t hold it’s shape, while coming to room temp after removing it from fridge. any suggestions? do I need to add more flour? (i use whole wheat and spelt combo)
I would try a little less water or more flour. 🙂
Gwen, I am new to THM and had a question about the kind of flour options that are available to make this really great. I went crazy on a sale on garbanzo bean flour and just wondered if anyone has tried that. Thank you so much!
Hi Dana, Garbanzo bean flour has a unique taste, and I don’t think it would be a great direct sub for this recipe, but it’s definitely usable in an E setting. Look up a recipe for falafel, maybe? 🙂
This bread dough was easy to make and ready for baki g. The inside was delicious but the crust was very hard. Did I overbake (25 min. at 450)? I used whole wheat flour.
Using all whole wheat can give you a tougher finished product. I bake around 20 minutes, and lighten it up with just a little unbleached. 🙂
I am really excited to try your recipe since I have never made bread before and this looks so easy and yummy! Since I already have a bunch of sprouted flour on hand, I am going to use that, but wonder if the 5-7 day fermenting process is necessary to create the “good” carbs when using sprouted flour?
If your flour is already sprouted, you don’t need the extra fermentation time. It’s already THM friendly as it is! 🙂 The sprouting process produces denser bread, so you may have to play with it a bit.
Can this dough be cooked in a bread pan to make more uniform slices?
I’ve not had great success with this in a bread pan when using whole wheat flour. I like it best as a flatbread. Others I know have made loaves, and I’m not sure what their secret is. 🙂
hi can you tell me how this bread recipe works in both E and S on THM plan? I am going to make the starter tomorrow once I get a glass container. thanks for your explanation. ps love your recipes.
This bread recipe is an E: it’s made with wheat (grain), so it’s a healthy carb source. 🙂
Ok, so, if this is an E bread, how can I use it for pizza and the like since we can’t do cheese with an E? I am sure I forgot some of the rules, but I wondered about this. I have this currently rising on the counter before I put it into the fridge! Can’t wait to try it.
Check out my Cheese Pizza recipe…it’s bending the rules on food types a bit, but I squeezed the numbers in for 2 slices with part skim mozzarella. 🙂
My dough has been in the frig less than two weeks and is turning black. What’s wrong?
The darker, grayish layer on top is where the very top is oxidizing from touching the air. It’s perfectly normal, and doesn’t affect the flavor of the dough. I like to use it by 2 weeks, because it tends to take on a more sour flavor after that. 🙂
I have tried this recipe 4 different times and EVERY SINGLE TIME, my bread sticks to the parchment paper and will not come off. I have to either cut off an entire bottom of the bread to keep it to use it or just throw it out. Any suggestions? I also tried a little bit of pam on the parchment & STILL it stuck. What am I doing wrong?
I’ve never had that happen Dawn. Maybe try a different type of parchment? I’m so sorry. That’s frustrating.
So I love this recipe and I’ve been using it for quite a while now. The family is really enjoying the pizza I make with it. So I thought I would be smart and make up a double batch. Obviously I picked the wrong time because life has been crazy and half of it has been sitting in the fridge waiting to be used up. My concern is it has now been sitting for nearly 4 weeks, do you think it is still good? It still smells like the fermented dough it smells like at the 2 week mark, which is the longest I’ve let it go before and still ate it.
I go by smell…fermented foods keep for very long durations. It does get more sour the longer you let it sit. My recommendation would be to go ahead and par-bake it and freeze it. 🙂
I have had my dough in the fridge for 10 days and just opened it to make a loaf and there were small pools of dark liquid and the smell was really strong. Has the dough gone bad?
Nope…the liquid and darkening on top are normal. It smells increasigly like sourdoug as you near the 14 day mark. I prefer a more mild flavor. If there is an off smell, it’s usually from some other microbes sneaking in, so keep it lightly covered. 🙂
I was all excited about this till I got to the part about adding yeast. I need a truly sourdough bread recipe that does NOT use commercial yeast.
Hi Cathy,
This is a cold ferment recipe that uses commercial yeast. I’ve not played a lot with sourdough cultures. This one is Trim Healthy Mama compliant though.
I have been using this method for years and assumed when i started THM that the no-knead bread was not on plan since it’s not sprouted and not a true sourdough. But you’re saying this is on plan?? As long as a certain percentage is whole wheat? Because I have the first two Artisan Bread in 5 Minutes books, and one of them is for whole grains. Can I have good bread again??! I have been on the verge of losing it lately with the lack of good bread on THM. Please give me good news!
It’s great news! Cold ferment for 3 days counts as fermented…so you’re good to go! 🙂
So…this is using regular whole wheat flour, not sprouted? I have both…but don’t want to use up the sprouted if I don’t have to.
No need to use sprouted in a fermented recipe. Great question!
I love this recipe. I need to understand something. I follow thm. Your directions state if I leave this ferment 72 hours max carb break down occurs. Is this thenon plan.
Thanks for sharing your recipes. I do have your book. Love it
Yes. Pearl (the author of THM) approved this bread for the THM plan. It’s fermented, which makes the carbs more friendly. It doesn’t remove them, but it changes how they’re processed in the body. This is an E recipe.
Hi, Gwen! First of all, I have your Unofficial guide to THM and it has been such a lifesaver. About this recipe, can I really eat pizza this way (on occasion)? I have my dough fermenting in the refrigerator as we speak and was wondering what to do with it all! Sorry, I’m new! 🙂
You sure can! There are links at the bottom of the post to the pizza recipe. I am careful with the cheese to keep the fat amounts in E territory.
I am a THM newbie but if this is an E bread how do you eat pizza and put butter on it without it becoming a crossover?
Thanks for the recipe! Can’t wait to try it!!
Hi Becki,
You can have up to 5 grams of fat in an E setting…so you’d want to limit your butter to that if you’re choosing that as your fat. 🙂
Hi Gwen,
Did you source this recipe from Artisan Bread in Five Minutes a Day? I love this recipe, have used it for years, and am glad to hear that it is THM friendly.
Hi Wendy! I didn’t. I sourced it from a woman who sourced it from the New York Times article that the authors of Artisan Bread in 5 were inspired by…I cite my sources in the post. 🙂
HI Gwen
My first loaf is in the oven, spelt and white flour. I have a question about your recipe: might be a dumb one, but there is a step where you tear away one-forth of the dough. Is this the chunk that you shape for baking? What do you do with the rest of it?
And when there is a little bit left, does this count as a ‘starter’ for the next batch? Do you just add the recipe (6 c flour, water, yeast etc to it) and incorporate all together, or is the process different?
Sorry for all the question 🙂
Megan
The 1/4 dough that you tear off is what you form and bake into a loaf. It makes about 4. The rest of the dough, you just stick back into the fridge. I have not made it with sourdough starter, but I hear that you can. The yeast is the fuel to get the fermentation going here.
I was wondering if you can use original active dry yeast (not the fast one)?
Yes! Either works.
This is my second batch of dough. The first batch was perfect, and my husband was so excited. My mom kept saying, ” I’m so happy you can have bread!” (I’ve obviously missed some kep explanation points, lol.) First I used 100% whole wheat, and now I’m using the 1/3 white flour option for THMers. I think I may have added too much salt because my dough didn’t double, even after 5 hours on the counter. Is this salvageable, or did I kill the yeast? Should I wait 5 days and just see how it does after the long ferment, or scrap it and start over? Any suggestions?
Im giving 5 stars because I know my issue this time is purely user error.
It may just be that the water was too warm and it killed your yeast. You can salvage it…simply add in room temp water with another 1 1/2 tablespoons of yeast, and stir it in and let it rise.
If my dough isn’t rising much is it possible that the yeast has gone bad? Or would there be other contributing factors?
It’s possible that the yeast is old, or the water was too hot. I use only room temp water now, and it works great!
Hi Gwen, I just had to say a big THANK YOU for this recipe and your pizza recipe as well. I have been on THM for a month, and I love bread more than anything. You were right – this is life changing! I can’t believe how easy this dough is to make. It has come out really nicely the 2 times I’ve done it. Thank you so much!
Can I use Spelt flour its THM friendly if not what is the best flour to use to stay on plan ….
You can use spelt, but you can also use wheat flour. It’s on plan due to the fermentation that happens with this recipe. 🙂
Hello, I just found your site as well as THM (waiting for my book to arrive). I’ve found your blogs to be so very helpful in trying to sort out all this new info about the THM plan. Thanks so much for all your efforts. I’ve never made homemade bread (except for rolls and cinnamon rolls) and I’m excited to have found this easy sounding recipe!
i was so excited to make this…i used the whole wheat flour and thought i would sub almond flour for the white….i’m not sure if that ruined it but it would not rise one bit. any ideas what i messed up or was that it.
almond flour is not a sub for wheat flour, since they have completely different properties. You can simply use all whole wheat flour next time if you prefer. 🙂 If you’re doing THM, adding almond flour (a nut= fat source) would make it a crossover anyway. Using all whole wheat is really tasty, and keeps it in E territory.
Can you use oat flour for this bread?
I haven’t tried it, but I don’t think it would work as well as wheat flour. The texture would be completely different.
What size container does this need to be put in? Your photos look like it is huge.
I make a double batch in a gallon size jar. 😉
How large of a glass container do I need to have to make this? yours seems huge!
I often use a double recipe for my bigger family. You should be able to use a gallon jar or something a bit smaller. Cookie jars work well!
If this is an E bread, using it as pizza dough with pepperoni or putting lots of butter on a piece of toast makes your meal an XO, right? And I’m curious, have you used this recipe to make into cinnamon rolls? I don’t think I have seen that option but am wondering if it works.
Thanks.
Norma
You’re right! XO or S helper if you’re adding fats. 😉
Ok. So I have a crock of “starter” that has been in the back of the fridge for (ever). Now I decided to give bread a try again. I fed it with 3 c warm water, 2 pkgs yeast, salt and 6 c sprouted wheat (what I had). I’m JUDDDING so tomorrow is a Down Day, meaning I can have all I want of this bread on Tuesday, Thursday or Saturday. Here’s what I don’t understand from the directions. Do I let it rise, then refrigerate; or refrigerate and then bring it out the day I’m ready to bake it?I should also mention that I just about filled the crock as the starter took up about 1/4 to begin with. There isn’t much room for it to rise. I’m guessing that it will spill over so I should put it in a bigger bowl.
PS. The more sour-y the better!
I’ve not tried it with starter, but if it rises like it does with yeast, you’ll need a bigger bowl.
My process is mix, rest/rise, and refrigerate until use. Then shape, rest (while oven heats up) and bake. Enjoy! Let us know how it goes!
We like your bread, all except we find the crust unusually hard to cut. What do you advise to use to cut it with. My bread knife doesn’t want to do the job.
Sarah Gingerich
It is very crusty! I like a good sharp serrated bread knife with a sawing action.
Help!! I must have done something wrong. I used the whole wheat flour, and my dough is more hard than sticky. The top of the dough was very hard.
Did you cover the dough in the fridge? It needs to be covered to prevent drying out. 😉
Would this work with all spelt flour or wheat and spelt?
Yes!
Try as I might, I’m still not successful with this bread after 2 years. I see that is it supposed to be wet and sticky, but shape it?? It’s like shaping jello! LOL As soon as I get it on to the cookie sheet it begins oozing and flattening out until it threatens to ooze off the cookie sheet. I’ve tried working in a bit more flour, but no go.
Before THM, I spent YEARS baking beautiful yeast breads and even had a baking biz for a short time. Perhaps I’m just not able to make the shift from those lovely, large high-rise breads to this one. On challenging days, this recipe can bring me to tears, and no bread is worth that! LOL
I’m sorry it’s not working out for you. It is very wet dough…nothing like traditional bread dough. You’re right…not worth tears. 😉 Stick to what you enjoy!
Thank you so much for sharing! This is do-able so yes, it’s life changing. Especially because my husband doesn’t like regular sourdough bread. Fresh, easy bread
Help! I mixed up the recipe using only whole wheat flour, and adding 1 tbsp of honey. I put it in a 1 gallon container and covered it with a kitchen towel. 30 minutes later it was overflowing onto my counter. I didn’t think whole wheat would rise as much.
Just move half into another gallon bag and let it rise all it wants. 🙂
It finally started falling in on itself.
I am a beginner or intermediate bread maker. I cut the recipe down because I didn’t have a container big enough. I used 1 1/2 cups sprouted wheat, 1 cup whole wheat, 1 Tbsp yeast, 1 Tbsp salt and 1 cup of water. (It did not look like it needed more water or o would have addes it.) It didn’t rise much in the two hour time frame. I put it in the fridge two days ago. Will it work better for pizza crusts and flatbread since it doesn’t have white flour in it? And did I do my math right (close enough) for the 1/3 smaller division? Thanks!!
Gwen, I used einkorn white and wheat flour. original yeast. My dough rose as high as your second pic. I left it out over night…really just 6 hours…when I woke up it had dropped to about half the jar. Is that supposed to happen. It is now in the fridge.
Yes…that’s totally normal, and it should still rise in the oven.
Thanks…Ill let you know how it turns out. Gonna bake some tomorrow. I don’t think I can get as many loaves as you say. I marked the level of the mix before it rose and after it went up then down it is at the same place where it started. What do you suggest so that next time I get the full amount?
Hi Gwen….This is my second time making this bread. My question is that it smells a bit ‘beery’ on the 5th day. Is this okay? I did not put it in the fridge (no room), but used my fruit cellar which is about 10 degrees, rather than 4 degrees like the fridge. Is that cold enough? Is the ‘beer’ smell normal? Can I use it for supper tonight? Thank you!! Btw–my family loved the bread first time around!
The warmer the room, the faster it will ferment. And yes…the yeasty smell is similar to fermented beverages. 🙂 It should be just fine to eat!
My mom made her own bread my whole life but I never have because it just seemed so complicated. I tried your recipe with sprouted brown flour and left it on the counter all day. I did add 2 Tbsp of honey (I remember my mom always put a little honey in with her yeast water when she baked bread. I figured it was a small amount for the whole batch.) This recipe was soooooo easy! I wasn’t sure how it would turn out, but it was great! A little tricky to get the dough to not stick to my hands, so I’ll have to remember the ‘wet hands’ next time. I only used part of the dough so the rest will sit in the fridge until next loaf. Thank you for making this so easy.
Hello for the UP! Just found your recipe and going to make it right now 🙂 Can I use sprouted spelt flour? I do have whole wheat flour I can use, but just wanted to ask. Thanks. I am 2 months into THM and need to dive into more recipes. Not just the quick meals.
Please forgive me if this question has already been asked! Can you substitute spelt flour into this recipe along with the wheat? If so, do you know what a good ratio would be? I bought spelt flour a while back and it’s just sitting in my freezer looking at me! 🙂
Ever made calzones with this dough? I know a lot of friends who use it for pizza crust, but I’m wanting to do calzones for a family lunch; just not sure how to shape the dough. Ideas?
Hmmm…that’s a little tricky with this soft dough. I might do smaller squares of parchment to shape circles, and then top and fold the paper over to seal?
Hey! I am allergic to gluten. Do you think I could use baking blend instead of flour? I’m desperate to find a good, less dense THM/gluten free bread!
I have a GF version, but it’s not THM-ified. This recipe doesn’t work for direct sub gf flour or low carb flours. So sorry. :/
Do you have any suggestions on how to use this basic bread recipe for sweets? BTW, I have make the bread sticks, and the pizzas…OH MY GOODNESS…sooooo BUENO!!!
So, in other words, the 100% whole wheat recipe from Healthy Bread in Five Minutes a Day (minus the vital gluten) is THM friendly, as long as I let it ferment multiple days before baking with it. Yay! I’ve been following this method for a number of years, even teaching full time with three young kiddos, and can testify to how easy it is. So glad I don’t have to give up my delicious bread on THM!
Hi Sarah! I’ve not read their book…found this recipe from another lady who saw it in the New York Times (actually where the Five Minutes a Day folks found it). But yep! A whole wheat version would work on plan! You may be able to add gluten? Not sure. 🙂
I’ve been making this recipe for years and so happy to see I can still have it on THM. I make paninis on my George Foreman grill with it all the time.
I make mine in my slow cooker – mine takes 2 hours on high and gives me a very soft crust. If it cooks hotter it may be one in an hour. I keep a piece of parchment right in the pot now and reuse a dozen or more times!
No need for a rest before baking. Cloak it and toss it on the parchemnt and right into the crockpot on high 🙂
Could I make half the recipe,or that will change something.
Thanks
You can halve it!
So I could grind my own wheat berries and make 4 cups of flour and use 2 cups of bread flour, that would be still consider THM approved as long its in the refrigerator for at least three 3 days?
Yes!
If I have a sourdough starter can I just add flour and water?
I have heard this will work, but I’ve never worked out the proportions. 🙂
i just found this site and copied the recipe and am going to try it soon is a p flour better or bread flour
Really, either will work. I’ve used both. 🙂
I’m sorry as I now this has been asked before but I can’t find it in the comments!! could you give me the link to the gluten free version of this bread please?
I don’t have a GF version, but there is a whole book from the authors of Artisan Bread that’s devoted to GF versions of this. 🙂
Not sure what is happening. I’ve made it a few times using all wholewheat flour. It’s a nice dough when I put in fridge and then as the days pass it gets runny. Any idea why?
That’s completely normal. 🙂
I am so disappointed. I tried this recipe and let it sour on the counter for 24 hours then left it in the fridge for 6 days to really decrease the carb count and when I followed your directions for baking a loaf it never rose and was a dense lump. I used fresh ground whole wheat and white flour in the ratio you suggested to make it THM friendly…the only thing different is that I did not have a pizza peel….and so used a cookie sheet with parchment paper. I did not preheat the cookie sheet like you did your pizza peel…..could this be the problem…that it need to be put on a hot pan in order to help it rise? I still have the rest of the dough in the fridge….
Yes…it needs to go into a very hot oven.
Do you think this dough would make a bagel?
Any chance you have been experimenting with a soft pretzel recipe from this? I wonder if one could knead in a bit more rye?
Can you use sprouted spelt flour for the bread recipe?
I would safe sprouted flour for other recipes designed for it. This one works with plain old regular unsprouted flour.
I have Bob’s Red Mill gluten free baking flour. I also have white/whole wheat flour. Could these two be combined to make the bread?
I would not use the GF flour in conjunction with the regular flour. Your final product will have have gluten in it, since you’re using regular flour. GF flour has different properties.
Thank you so much for posting this amazing recipe… works fantastic with rye by the way!! So how do you store your loaf?
Amazingly easy and a crowd pleaser. I’m a THM and serve the high carb version to my hubby and kids (don’t eat it myself). They get their “carb fix” and that leaves more yummy protein and veggies for me. Everyone is happy at our table. Thanks Gwen!
Do I have to use a pizza stone or can I use a regular baking pan? Or would you recommend using cast iron instead?
It’s a crusty bread, but VERY soft dough. You can use a regular baking pan or sheet, but will still need the parchment paper. Cast iron would work, but it will hold in lots more heat, and probably brown much more quickly.
This bread is fabulous! And awesome as pizza crust as well! It’s very easy, only requires you to plan ahead a bit, and is well-worth the little bit of effort required. So glad I ran across this recipe!!!
Made the dough this am; 1/2 ww 1/2 white. Just made a quick loaf per your instructions. Brushed top with water, sprinkled salt, sesame seeds, poppy seeds. Couldn’t wait for it to cool. Hacked it up, slathered on some butter and the family demolished it!! Super yum! Had so many lovely air holes and a slight sour dough taste! Crazy good; thank you. Making pizza tomorrow.
Since the recipe is an E and you use it for pizza, are you having a crossover, or do you do something else to make the pizza an E (or the bread S friendly)?
I have used it with part skim cheese to keep my portion still in E territory (number wise…I won’t tell if you won’t), or just enjoy it as a crossover. 🙂
I have tried to bake this bread several times and every time it is way too wet. I can’t even shape it into a loaf. It just runs flat. (My girls call it splat bread) What am I doing wrong? I follow each step carefully with no success. I am seasoned bread baker. I can make almost any type of bread if I set my mind to it. But not this one. Do you have any tips?
Ha! Splat Bread. 🙂
Add a bit more flour or less water to get the texture to be more like a muffin batter. Smaller loaves are going to work better with whole wheat flours, as they tend to stay softer/gummier in the middle otherwise. Best of luck! If all else fails, it’s an AMAZING flatbread/pizza crust. 🙂
Have this rising now for use later this week. Can not wait to taste. I halved the recipe cause i didnt have enough yeast for the full version.
Hi Gwen! Thank you so much for this recipe! It has saved my life trying to find a cheap THM bread! 🙂 I do have a couple of questions though. After I finish fermenting my dough, it hardly rises again when I set it out before baking (I use bread pans since it’s pretty slimy). The last batch I made was very crisp on the outside but still gummy on the inside, and I’m finding I always have to add a lot more water to the recipe to get rid of the dry spots (up to 1.5 cups). Any tips?
I love this recipe, so I really want to know how to perfect it!
Thanks! 🙂
Hi Katie!
Flour is a tricky ingredient, as it responds to the relative humidity (moisture in the air). I live in a pretty humid climate, but I still find that I have to adjust the water amount up or down depending on the day. I just go by texture.
For the gummier inside, try making smaller loaves, or stick to flatbreads. That’s typical of whole wheat or sprouted flours…they can really alter the texture!
Can you make a bunch if loaves and freeze them?
I like fresh baked bread, so I haven’t tried this. 😉
Hi there, I have made your dough 3 times and mine never looks stringy like yours. Mine just tears off, and it never rises like it should. What am I doing wrong? I use whole wheat and this time I used half sprouted whole wheat and half whole wheat. Help! I so want to eat this yummy bread…thanks for your expertise.
Whole wheat and sprouted wheat will give you a very different end result. The wheat bran interferes with the creation of air bubbles and rising. You can still make a great bread, but it will not be the same as using a refined flour with no bran in it. 😉
I followed the recipe adding 5extra Tbl Of Water. But my dough did not turn out to be gooey. It did rise nicely. So I will try another batch and add more water. So I will not date this recipe yet.
My bread is nice and brown on outside but when cut inside was still on the moist tacky a little like not all the way cooked. Why is this?
That’s probably the type of flour you used…whole wheat and sprouted flour tend to need to cook longer or they’re gummy. Try making a smaller diameter loaf. 🙂
I had saved your recipe and finally decided to give it a try. It was so dry I kept adding more and more water. I used the whole wheat flour ..4 cups and then 2 cups of coconut flour. I am not sure it will even be usable but I am wondering if I should keep adding more water since it definitely is not sticky and soft as your site shows.
Oh gosh…coconut flour isn’t part of the recipe. It’s a thirsty beast, and will not behave itself in this type of recipe. You need wheat flour. So sorry!
Hi Gwen, would the THM approved version make this bread a low GI version? I ask because I’m needing to lower insulin levels.
I can just tell you that it’s THM approved, and it meets their standards for slow carbs. I am not sure how it would work individually or affect blood sugar or insulin. 🙂
I cannot thank you enough for this recipe. You are right it Is life changing!
Can you keep feeding this bread of do you need to make new every time you use it ?
I make it new each time I run out. 🙂
I’m wanting to try this on Saturday! What kind of yeast do you use? Is rapid rise yeast ok, or should I stick with active?
Either one!
Thank you Gwen for all of your knowledge. You are helping my sister and I learn the THM way!
I am curious what you mean about this being life Changing. Is it because you prefer the flavor over a store bought sprouted bread? And when you use this as pizza crust does it become a crossover meal?
Hi Steffany!
It was life changing because it was SO easy and quick! I used to do all of the steps of making a traditional pizza dough, rolling it out, etc. And this is kinder on your blood sugars because of the cold fermentation. PLUS it’s delicious! 🙂
Hi Gwen! I just tried your bread recipe and we love it! One question: For the Trim Healthy Mama version can I use 4 1/2 cups of white whole wheat and 1 1/2 cups of all purpose flour as long as I ferment it the required days. Does that sound correct? I tried researching the difference between whole wheat and white whole wheat but I wanted to make sure I was following THM as I will be making this bread frequently.
Yes…white whole wheat is still a whole wheat flour. 🙂
Impressed that you have heard of Yoopers.
🙂
So glad I found this recipe! We are on THM plan and missing bread. We will use the WW flour. I have this lovely sourdough I keep feeding. How would I convert this recipe to using the sourdough, instead of making it fresh each time? Oh, and I ground my own flour so I need the weight of the flour instead of the cups. Is that possible? Thanks!
Hi there. I am just trying the recipe for the first time. Does it need a second rise, or do you put it in the fridge right after the 2 hours?
I let it rest after shaping, but it does most of its rising in the oven while baking.
I made a half a recipe (because that’s the biggest jar I had) with 2 cups whole wheat flour and one cup white. It rose beautifully and since I love sourdough I left it on the counter overnight. I thought I had followed the recipe I then left it in the fridge for five days to make it THM friendly, when I took it out today it was all watery at the bottom. It would not form surface tension but I let it rest for 40 minutes, baked it; it didn’t rise & it was as dense as dense can be. Any idea where I went wrong? P.S. it takes ok.
Whole wheat content makes rising more challenging. Try smaller loaves for better rise.
Hi,
I was wondering if this bread recipe can be used with a gluten free flour. I am just learning about the gluten free so I am not sure. If the gluten free flour will work. Please advise. Thank you
Hi Stacey,
I have developed a fantastic GF version of this recipe, but it’s not low carb. I can share it if you’d like.
If you used “spelt” flour instead of whole wheat flour and followed the same fermentation process, would it be THM approved?
Spelt is a type of wheat, and you can definitely use it for this recipe. They still want you to use whole wheat in part for the THM version.
Hey Gwen, wanted to let you know I love your blog! Also wanted you to know when I print your recipes (even clicking print version) it leaves some off of the left side. I don’t have this issue on other websites. Thanks!
This sounds like.somerhing I will try.. I love bread,
I also really have enjoyed the mug Bread from THM first book … Looking forward to the time that I can begin implementing this into my rutinen…. Thank You for sharing your links …. Kristiana
I use Einkorn flour because of the easier digestion of gluten. Using your recipe as it is, my dough is very wet. Any suggestions?
I haven’t used Einkorn with it. Flour adjusts with the humidity, so rainy days you may not need to add as much water. But this is a really wet dough…almost like muffin batter. If it’s too loose, just add a bit more flour.
I am not sure where I went wrong but this was aweful…not much rise and the flavor was less than good. So disappointed. I used the whole wheat for 4 1/2 cups version. I actually was looking for a sour dough starter but happened apon this and gave it a whirl. I am an avid bread maker and have baked with yeast for years but this was not a good experience.
Sorry it wasn’t a win for you.
I just made some using whole white wheat. It seemed to rise and double in size. Let it sitover night and put it in the fridge about 20 hours after mixing. After being in the fridge, it shrank a lot! Is this normal? Is it going to be super dense now? First time making bread.
Normal, and it will rise while baking. 🙂
Baked mine today and they did not rise after baking. I did whole wheat that I ground fresh. I let it sit on counter for two hours and it rose. Then placed in fridge for seven days. I made a second batch (which I doubled) while it was rising on stove for 40 min. My new batch is on counter and is doing the same thing, nice rise. So I am thinking it can’t be the yeast. Is it possible it stayed in fridge too long or should I have left it on the counter longer than 40 mins to rise? Really was disappointed, as I use to make bread all the time, not sour dough, and since doing thm I gave up making bread. My homemade bread always turned out great. They are soft but still look like little bricks.
I enjoy cooking, Breakfast is my niche in life especially Omelettes, back in the day I got up early to surprise my Parents Breakfast in bed on Saturdays. I enjoy doing for others, I look forward to your Nest recipes & ideas. Enjoyed your Garlic pill idea, going to start this weekend.
I’m in GA w/my Mom showing her your Bread recipe. She had questions along the way, she was impressed, my New Year will begin with your all’s Garlic Clove pills & some Coconut Oil, I am BIG on Holistic, having my spleen removed in 75 due to Leukemia I look for ways to build it UP. Have a Blessed New Year….
So easy and it taste great! Thank you for the recipe! Happy New Year!
This is really an EASY recipe. I follow THM so I used all wheat flour. I may try to mix it up a bit next time with white flour. The pizza crust was yummy and what I was missing since starting THM… pizza crust I can hold with my hand. This Chicago girl approves! I’ll be making a loaf of E bread with my dough sooner rather than later, I mean, I do have it sitting in my fridge! THANKS for the recipe Gwen!
Gwen, fantastic looking recipe. I’m in Germany and there is a lot of spelt flour here. What are your thoughts on spelt vs. whole wheat if doing ThM version? Thanks! Elizabeth
Would the spelt be WW or refined? I haven’t tried it, but please share your results if you have! 🙂
I Am SOOO EXCITED~ OMG, I Can Hardly Stand It! I ADORE, AM IN WITH, AND COMPLETELY CRAZY ABOUT SOUR DOUGH ! But it’s usually a Daunting Task Just READING The Recipe, but YOURS Didn’t even Give Me Anxiety~ the racing was just pure excitement. So if you haven’t caught on yet, I will follow the instructions to MAKE MY DOUGH SOUUU~ER!
BTW~ I You… You’re So Funny (Like Me!) And Your Recipes Are Just FABULOUS! You’re my new bestie~ NO reciprocation required here, which is why I make such an EASY, GR8 Friend.
Thank You so much for all the work~ All Of Yourself~ that you put into Your Recipes, and your blog.
Blessings & Purrs,
You made me smile, Kat! Blessings and Purrs back atcha. 🙂
My cousin and I have been baking a lot of bread recently, and the next time we would bake another, I will suggest we’d make this one. it looks good! We usually just add cinnamon sugar to our freshly baked bread tho. A little cinnamon sugar won’t hurt the recipe, would it? We would want to impress our grandma with this. Thank you for this recipe!
I want you to know I’ve fallen in love with this dough! This is probably the 4th recipe I’ve tried and I’m done looking! It is so versatile. I’ve made cinnamon rolls, pizza,and breakfast rolls stuffed with turkey and low fat mozzarella and several more things. I even have my mother in law hooked! Thank you!
This makes me SO happy! SO glad you’re enjoying it!
Hi! Bread recipe. I made it once and it is definitely a keeper, so yummy! However, I’m not sure what I am doing wrong. Follow the recipe exactly but when I shape the Lowe’s and let them rise for 40 minutes they do not rise. They just stay flat and tiny. Why is this? When I let the dough rise the first time in the bowl at Rose just fine. Just wondering how I can fix this so my bread will be as beautiful as in the pictures! Thanks!
Hi Nicole,
They don’t rise so much on the counter. They will rise in the oven while baking. Rising also depends on how large your loaves are and what flour you are using. Some flours (whole wheat and sprouted) give you a softer middle and don’t rise as well. Try making smaller diameter loaves and see if that takes you where you want to go. 😉
Is there any way to make it softer?
This recipe is for crusty bread. Bread making is a science, and I am not into it enough to crack all of the codes. I just like this simple recipe!
What do u do with the part u pinch off?
I use it to make the loaf. The rest stays in the container until I’m ready to make more!
I can’t wait to try this recipe!!! I do have a question though! I’ve been playing around with sourdough bread and was confused that this bread has yeast (instead of starter) but it still considered fermented as it sits…totally don’t know what I’m doing here haha trying nonetheless x
Yes! This bread is using yeast as a quick and easy sub for a wild caught culture. Some people really enjoy caring for and using wild caught sourdough cultures. I’ve never really been willing to fuss with them, so this is a good alternative. You get the benefit of cold fermentation, a tasty end product, and easier to digest carbs, which is really all I’m after here. 🙂
Can you provide the measurements for flours in weight please in order to use with different flours but still get similar hydration… thx!
I have never baked using ingredient weights, so that’s why I haven’t included it here. I live in a very high humidity area, and weight will vary based on the relative humidity and how that affects the flour. It’s a little bit of a “going on feel” game, I’m afraid. 🙂
Hi Gwen,
I am looking forward to making this!
Jane
I have a question. When I leave my dough in the fridge for 7 days the top layer gets very discolored….is this normal?? Is there something I need to do to fix it? I love the dough and have used it for several different things. I’m very pleased!
That’s completely normal and nothing to be concerned about. I usually just tip off the extra liquid into the sink.
Hi Gwen. How would I adjust this recipe to use my sourdough starter instead of yeast? I’m just starting out with sourdough. This looks great and easy. Thanks.
You could take out 1/2 cup of flour and 1/2 cup of water from the totals and add a cup of sourdough starter? I’ve not tried it, but it seems like it would work. 🙂 Let me know! Several people have asked about doing this!
Personally, I started doing this to get away from the fuss of keeping and feeding a sourdough starter, but it sounds like it would work if you have starter on hand.
I Cant WAIT to try this!!! I don’t have any whole wheat flour on hand but think I will mix some white today and see how I do! Sounds like I can’t go wrong! Thanks for this and hope to see more like it in the future! Happy I stopped by!!!
Enjoy!
Just tried the bread recipe. I think I added to much water will this be ok. I used sprouted wheat flour it rose nicely then in the frig it colasped and hasn’t risen since.
That’s normal! Sprouted wheat doesn’t need to be fermented on the THM plan. It’s a different animal from regular whole wheat flour, and has a unique final texture. It may take some toying to get it to a texture you enjoy…try smaller loaves or pizza to get it to crisp up and cook through. I find it to be gummier than what we like in this recipe.
I just wanted to comment this time to thank you for this recipe! I used it to make bread and pizza about 5 years ago, and am just coming back to it now. I was going to dabble into sourdough and before I do that I thought, why not try that E bread again since it was so easy? I followed the instructions to make it a more sour flavor and it turned out lovely, which I will do again. Best pizza I’ve EVER had and I can’t believe it’s so easy. Thank you for sharing this with the world! It’s about to find a permanent home in my recipe book. 🙂
Pizza crust that is everything I ever wanted pizza crust to be. Better than my favorite upscale pizza restaurant’s crust, no joke. I made one large pizza for lunch, and I formed the rest into a loaf that is in the oven right now. It’s going to be hard not to eat it today! Also it’s suspiciously easy, I kept thinking there had to be more to it, and it looked wrong at every stage but it all worked out in the end. Thank you, Gwen!!!
Thank you! It’s my fave too! I have RUINED my kids for takeout pizza. They are snobs now. 🙂
Does sprouted flour work for this?
Sprouted flour is already a complex carb, so it’s not necessary to ferment it first. I haven’t tried it in this recipe.
Have you ever done a nutitional evaluation of this recipe? I entered it into a computer program and found that if divided into 30 slices it has 19.2 g of carbs and .08 g of fibre; if divided into 24 slices, it has 24 g of carbs and 1 g fibre. This does not take into account the 72 hours of rising in the fridge which is supposed to reduce the effects of the carbs. Do you have any idea of what the comparison value of carbs would be for the 72 hour version? Just I’m also wondering how this compares to making bread the usual way (rising and baking in same day) using sprouted whole wheat flour. The sprouted whole wheat flour is so expensive so would like to use this recipe if it is comparable in carbs.
Hi Shirley,
So, from my understanding, sprouting or fermenting don’t actually change the number of carbs, but how they body handles them. It’s supposed to slow the rise in insulin after eating a complex carb. This isn’t a “low carb” or keto recipe…it’s a fermented recipe to help turn simple carbs into more complex ones. So I definitely consider this to be a source of carbs, albeit a healthier one. 🙂
I have not done the nutritional calculations for this recipe, because we tend to use it multiple times, and a different amount if we’re making a large pizza crust vs a loaf of bread. So you’ll want to first divide your total carbs by the number of batches (loaves? flatbreads/crusts?) you think you’ll get from this whole batch, and then calculate for carbs per slice. Hope that helps!
Hi Shirley, I am just a curious food enthusiast, and this article may answer your carb question.
I was so amazed with the idea of fermenting the dough for a long period to decrease the carb count but could only find this single study on the effect of fermentation over carb, its amazing!
Just google:
Assessment of loss of carbohydrate through fermentation process of yeast (Saccharomyces cerevisiae) from small sample of maize flour dough
By Kasahun Gudeta and Messele Admassu
Would it be possible on this to use vital wheat gluten with it to ensure the whole wheat flour gets a better rise? I know on Glenda’s recipe she uses vital wheat gluten.
You sure can try it! But it won’t ultimately fix the problem with whole wheat, which is that the little flecks of the bran throughout the flour pierce the air bubbles as they form, and deflate them.
Can you use sprouted spelt flour?
I haven’t tried it. Sprouted flours have a very different end texture when baked, and they also don’t require the fermentation step to be considered healthy carbs. If you try it, let me know how it turns out!
Hi Gwen, do you punch down the dough after the rise on the counter before moving to the fridge?
Thanks!
I don’t. Moving it, and or the cold temps will bring it down. If it’s overly exuberant, you can shake it a little to bring it down. No punching required!
Hi! Im so excited about this recipe, but I’m very new to sourdough/making bread in general. Does this not require a sourdough starter?
It doesn’t! This is the easy button of fermented bread recipes. You just use regular yeast to get the process rolling.
I make make wild yeast with AP flour, could I use that instead of the commercial yeast?
I haven’t tried it with traditional sourdough starter, but it would probably work similar to a sourdough recipe. 🙂
Love this recipe! So versatile….thank you!!
Love this recipe! Made with unbleached flour and whole wheat…delicious either way!!!
Would this work with gluten free flour?
I have never tried it, but my guess is that you’d need gluten to get the stretchy rise.
Sourdough does not use a yeast starter. If is fermented from wild yeast. This isn’t sourdough.
Thanks, Angela! Enjoy your bread. 🙂
Thank you so much. I am self-isolating thanks to Corona. So I used what I had on hand. I used your measurements but regular yeast and added a spoon of sugar. It sat out for a while rising then off ti the fridge. I kneaded some and it made a beautiful dough for naan. Then later i used some (kneaded it) for pizza. A delicious pizza crust was to be had, guess I will never need to order pizza again. I still have some dough left and will be making a few sweet rolls with berries from it. This recipe is a keeper. I used to keep my ‘go-to’ recipes in my safe until i lost the key, lol. When i get a new one this will be in there with recipes from my great grandma, grandma, mother and aunts. Thanks for brightening my day with a delicious treat!
This makes my day, Patty! Thank you for letting me know how much you’ve enjoyed it. I want to come eat sweet rolls with you! And I have to laugh about losing the key. That is SO something I would do!!!
I LOVE this recipe. I was wondering if you think we could add …say garlic and rosemary to the dough at the beginning when we are mixing it?
I do think you can add herbs! But rosemary and garlic are both antimicrobial, so I would wait until you are ready to work with the dough to turn them into it. They may affect the yeast action if added at the start. I would probably go for garlic powder as well to be on the safe side. I love to add fresh herbs and parm to the top of the crust or bread as it goes into the oven. SO much flavor! 🙂
I have a question. For a low histamine diet I know that you are supposed to avoid sourdough bread. Would this recipe have the same effect? Even though it is fermented, it seems to me that the cold fermentation would have less histamine. What do you think? Thank you for your thoughts on this.
Oh, dear. I really have no idea…so sorry! I always like to look for Facebook groups for specialty info. My group, Gwen’s Nest Herbal Chick Chat is a great place to ask. I have no experience with low histamine diets, but I’m certain there are ladies there who are super smart in this area. 🙂
I have my starter ready to go and am excited to try my hand at sourdough bread, but for the life of me I cannot find how much starter to use in the recipe. I’m sure I’m overlooking it. Could you please clarify that for me?
Hi Jennifer! This recipe uses regular yeast to get the ferment going. I haven’t tried it with starter, but you could probably sub starter for yeast? Let me know if you try it!
Hello Gwen, I love this recipe and have used it for a while now. However, one of our girls has just been diagnosed coeliac and we have had to cut all gluten from our home. Can you tell me if you or any of your readers have tried this recipe with gluten free flour with any kind of success? Thanks!
Cheryl, I have just ordered the new Artisan Bread in 5 minutes a day book, and the newer edition is supposed to have a section for GFf!
Thank you Gwen for simplifying the bread recipe! It has passed the yummy taste for my Italian bread eating husband and also my teenage son.
Oh hooray! SO glad you are enjoying it!
Hi! I accidentally used regular “Instant Dry” yeast (instead of the “Rapid Rise” you specified). Seems to be rising well for the first 1-1/2 hours on the counter… Should I expect it to perform OK in the fridge and during baking?
Sorry, I used “Active Dry” (NOT the “Instant/Fast/Rapid” yeast)…
Yep! You can use any of them interchangeably here.
I made this dough, let it sit for 5 days and then made pizza. It was amazing! Left the rest of the dough in the fridge for about a week and a half. It now is covered with brown liquid. I drained it off and tried to shape the dough for a loaf of bread but it is sooo wet. Should I not use it? Is is bad? What are your suggestions.
The liquid is totally normal for sourdough…you’ll know by smell if the dough is still good. More than likely, it’s going to be very tasty and a little more tangy than the last time you made it. You can either pour off the liquid, or stir it in.
Was thinking about trying to create THM beer bread recipe. Any suggestions? Beer bread is my favorite with soups
Help 🙂 I received a starter, I think I killed it. I now have a bowl full of dough, not sure what to do with it? I think it’s not active but I don’t want to waste it or eat it Bc I don’t want to go against THM- help help
Is there any way to make this work with GF flour blends?
I don’t have a GF low carb mix, but I do have a GF mix that I’ve developed that is amazing and works with this technique. Let me know if you’d like for me to blog it!
We had this recipe on Thanksgiving day this year…….and OH WOW…..can I just say?!……….I’m so grateful for your post, and I’m so grateful that it is still living on the net after all these years……and I’m so grateful for this easy tasty bread. I don’t have to keep my sourdough starter alive if I don’t want to!! As you said….LIFE Changing.
Can I use gluten free flour for the bread recipe? I want to make pizza
I don’t have a THM GF mix recipe for this dough. So sorry. I do have a non-THM GF recipe that is SO good…I can blog that if you want it. 🙂
I see there are 575 comments so not sure if this question has been asked. Do you need to use a glass container?
Nope! 😉 I started out using a cleaned out plastic bin from salad mix.
My 7 year old son and I mixed up the dough on Tuesday and baked it on Saturday. It was delicious! I follow THM and did the part whole wheat and part white flour. Then my 3 little ones and I shook up a batch of homemade butter, we had fun eating them together. Thank you for this recipe! I’m too lazy for sourdough or anything that is labor intensive. Even my hubby loved it and that’s a huge win!
So happy to hear this! <3 🙂
Do you have a gluten free version of this. I very much want to out this into practice but can’t so the gluten. Thanks!!!
I have a GF version, but it’s not low carb or THM friendly. If you’d still like it, I’ll be happy to post the recipe! It’s pretty amazing!
Newer to bread making, but I know fermentation time for sourdough bread is now 7hrs counter or 24hrs in refrigerator….is this the same for when making bread with whole wheat flour?
Gwen, I have a question. If I wanted to let the bread dough ferment in the refrigerator for 5-7 days, do I just mix and put directly into the refrigerator or do I proof it first?
Thank you!
Let it rise on the counter for at least a couple of hours or overnight before placing it in the fridge.
2 Questions:
1. If you use bread flour for the white portion, is it still THM on-plan?
2. As I’ve been investigating pizza baking, I’ve read that parchment paper can’t catch fire at 450 and above for more than 20 minutes, especially on a baking stone. Have you had any issues with this? Do you use a particular brand of parchment paper?
Hi Kristi!
1. Yup!
2. I have not had it catch fire UNLESS it accidentally touched the heating element.
I am not brand specific on parchment, but I am wary of cheap parchment. Aldi and Dollar Tree both carry parchment that is NOT non stick, and it melds itself to the pizza. Avoid those for sure! 🙂
I made this but couldn’t handle the whole wheat so i made it with white flour left it on the counter for 24 hrs then for 7 days in the fridge took 1/3 and made a small loaf left 2/3 in fridge after 7 days t took 1/3 made a loaf then in 7 days did another loaf would this be considered sour dough
It wouldn’t technically be sourdough, as that refers to using a wild caught yeast starter.
It would be fermented by the yeast in the recipe. But it would not qualify as a THM E option, because you’re using white flour as your starter (which lacks the natural fiber found in whole wheat.)
But I’m with you…the fiber in whole wheat makes a more dense product, because it pops a lot of those lovely yeast bubbles!
Can I also bake this bread in a loaf pan? Can you make these into biscuits?
This bread has a specific texture. Depending on the flour you use it’s either going to give you a very crunchy crust or a chewy texture (whole wheat). It’s a hearty, dense bread. In the south, where I’m from, biscuits are made with soft flour to give them the dense fluffy texture, and we don’t use yeast in them.
If you’re new to making bread, try this one the way it’s written, and see if you think you’d enjoy it in a bigger/denser loaf. I personally really enjoy it in skinny loaves or as a flatbread/foccacia/crust.
Hi Gwen, Thank you for an awesome recipe with this Easy Bread.
Just one question as I am in Australia, What sizes are your cups and spoons?
Our cup is 250 ml and a tablespoon is 20 ml.
Thanks heaps, Jodie
Hi Jody! I used a converter and it says a US cup converts to 237 ml and Tablespoon to about 15 ml. Hope that helps!
Can you use this dough for sweet things, like cinnamon rolls?
Hello Gwen,
I’ve been trying to make sourdough bread, but live in a cold climate and find it too frustrating and confusing. So love your simple recipe. We sprout our own wheat berries, so that makes the process even easier.
A big thank you from Wintry Tasmania. Geraldene
So glad this is a useful recipe to you! Stay warm and well, Geraldene. 🙂
Does this recipe work with GF flour?
GF flour is a different animal, so no…it’s not going to work as a direct sub. BUT I have been working on a GF version, and it’s fantastic! (But it’s not low carb)
I want to use Flour 95% organic Sprouted Spelt in your E Bread Recipe, as it’s the only sprouted I can find. Will this work? Not have ever made bread before do I need to change the recipe any when using this flour.
Hi Lana,
You don’t need to use sprouted flour for this recipe. Any old whole wheat flour will do! 🙂 The slow cold ferment will create a THM friendly bread.
Hi I am very confused how we can use all the regular flours and be thm… also My daughter is ALLERGIC to wheat… have any suggestions for this recipe for gluten free…?
I answer both of these great questions here in the Easy Bread FAQ. 🙂
When I take the dough out of the fridge do I need to leave it out to rise again or does it go straight in the oven?
I just recently found your blog, and made this for dinner tonight. My husband and four kids loved it…they all had seconds and we all loved this…so tasty!
It doesn’t rise again, but you shape it and let it rest for a few minutes…I describe it in the recipe. 🙂
do you need to close the container when putting it in the fridge?
The container needs to be covered, but not sealed/airtight. Air needs to be able to escape, but the dough needs to be protected from drying out and being tainted with other flavors. 😉